Issued: January 1, 2010
Standards Research and Development Branch
Motor Vehicle Safety Directorate
TRANSPORT CANADA
Ottawa, Ontario
K1P 5H9
Unless otherwise specified, all dimensions are in mm and inches
Tolerances shall not be cumulative
MM:
0 to 12.7mm ± 0.79mm
12.7 to 25.4mm ± 1.580mm
25.4 to 127mm ± 3.175mm
127 to 254mm ± 6.35mm
FRACTIONS:
0 to 1/2 ± 1/32
1/2 to 1 INCL ± 1/16
1 to 5 INCL ± 1/8
5 to 10 INCL ± 1/4
Remove all burrs. Break
sharp edges .12700mm - .38100mm
sharp edges .005 to .015 INCHES
| NAME | DRAWING SHEET NUMBER | DATE |
|---|---|---|
| SEAT ASSEMBLY | 2010SSA100 | 01/01/2010 |
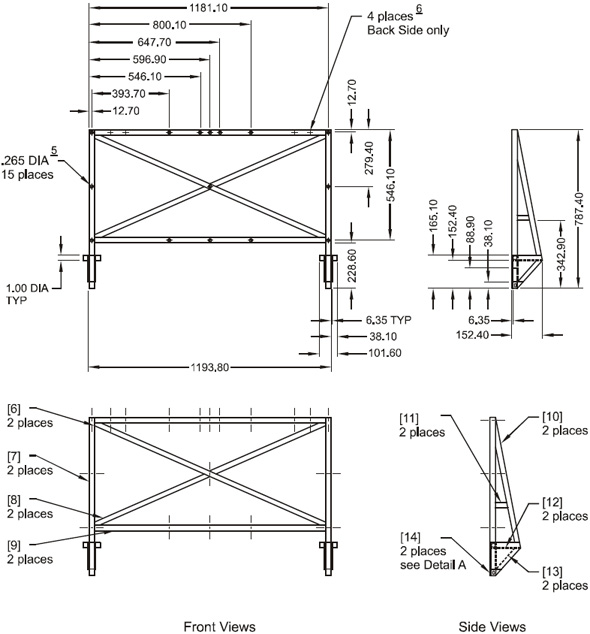
| FRAME, ASSEMBLY | 2010SSA200 | 01/01/2010 |
| FRAME, FRONT AND SIDE ASSEMBLY | 2010SSA201 | 01/01/2010 |
| FRAME, BOTTOM ASSEMBLY | 2010SSA202 | 01/01/2010 |
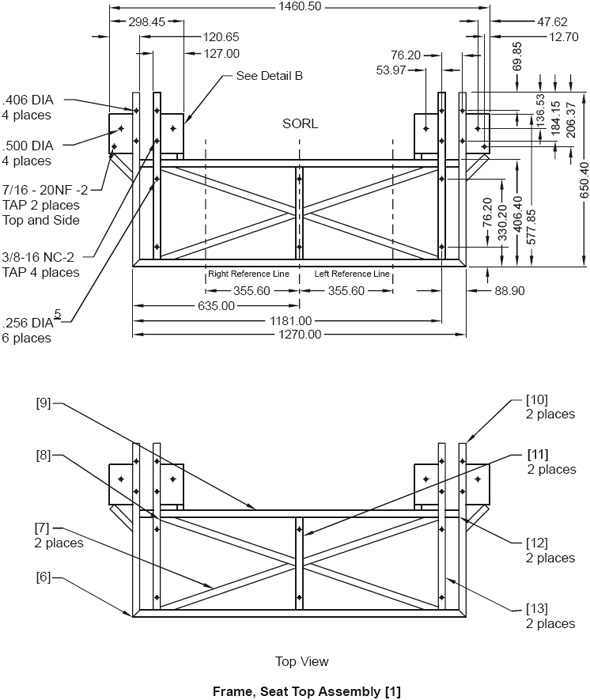
| FRAME, SEAT TOP ASSEMBLY | 2010SSA203 | 01/01/2010 |
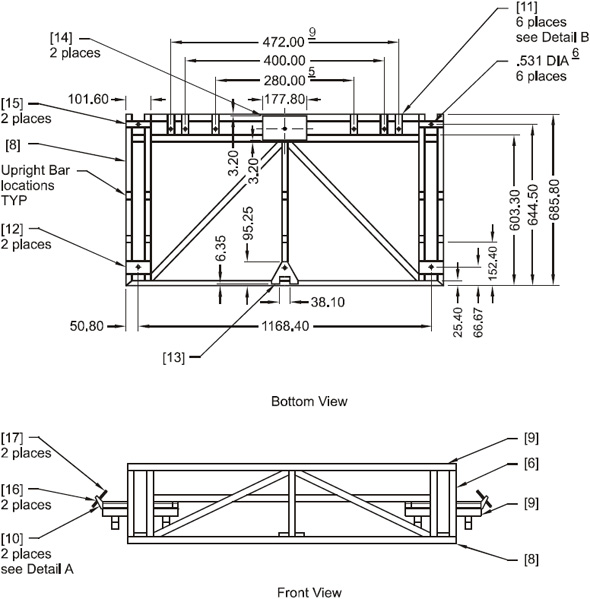
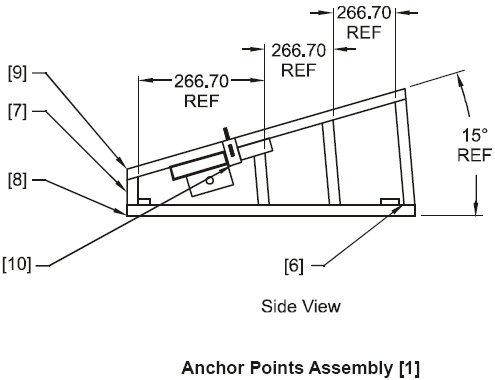
| ANCHOR POINTS ASSEMBLY | 2010SSA204 | 01/01/2010 |
| FRAME, BACK ASSEMBLY | 2010SSA205 | 01/01/2010 |
| CUSHION, ASSEMBLY | 2010SSA300 | 01/01/2010 |
| CUSHION, SEAT ASSEMBLY | 2010SSA301 | 01/01/2010 |
| CUSHION, BACK ASSEMBLY | 2010SSA302 | 01/01/2010 |
| BACKING, SEAT AND BACK ASSEMBLY | 2010SSA303 | 01/01/2010 |
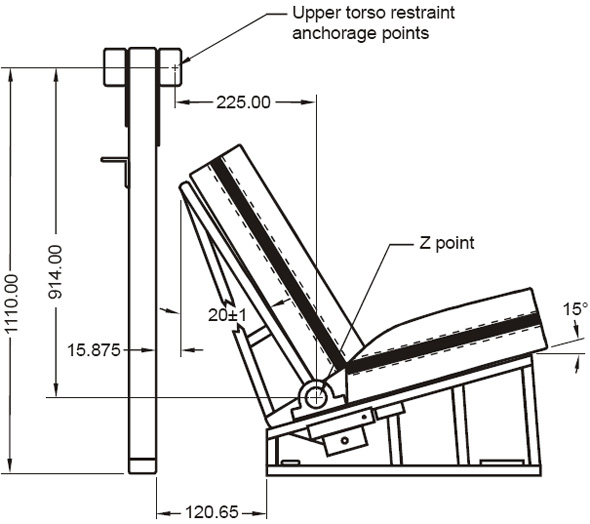
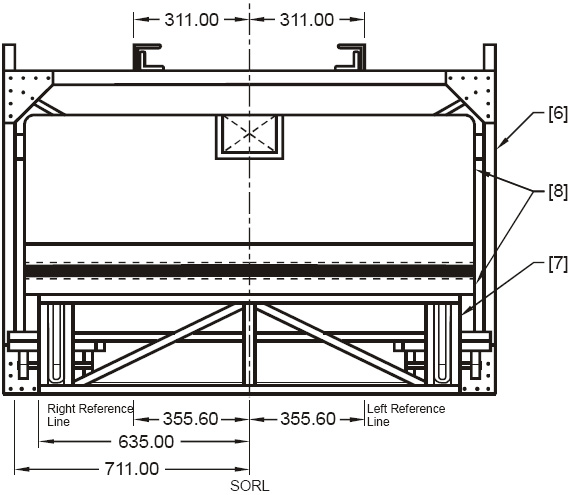
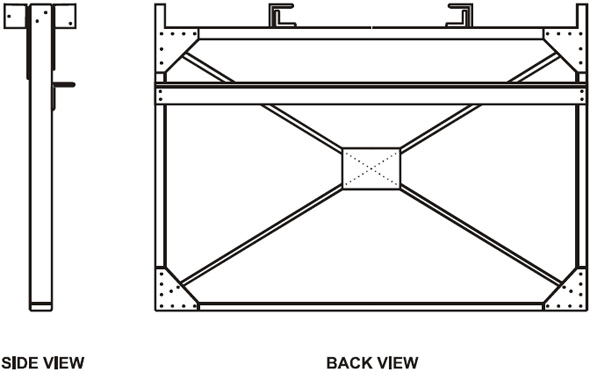
2010SSA100 – Seat Assembly
SIDE VIEW
FRONT VIEW
FRONT VIEW
Notes:
- Dimensions in mm
- Drawing is not to scale.
Parts List:
[6]. Bar assembly
[7]. Frame, assembly
[8]. Cushion assembly
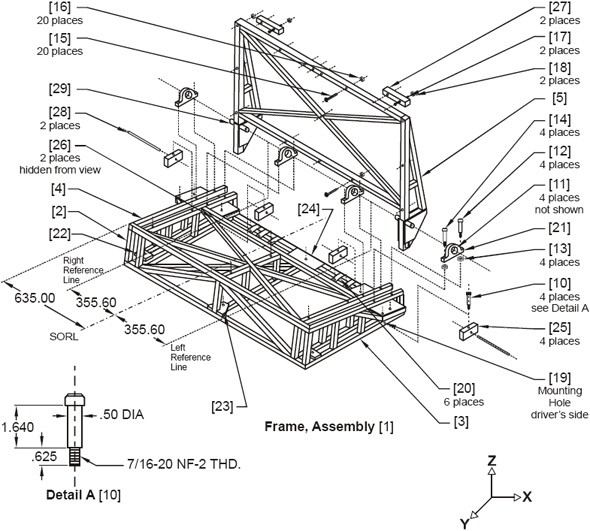
2010SSA200 – Frame, Assembly
Notes:
- All dimensions are in mm except for parts, diameters, and welds, which are in inches.
- Drawing is not to scale.
- Pivot Block [25] should be free to rotate with Shoulder Bolt [10] installed.
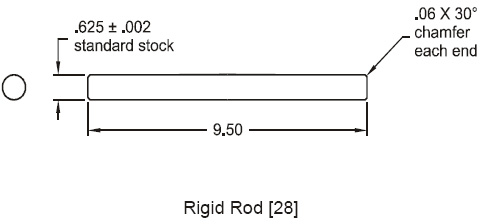
- Rigid Rod [28] shall be replaced after each test.
- Round HD Screw [15] and HEX Nut [16] shall be assembled to Frame, Seat Top Assembly [4] and Frame, Back Assembly [5] before cushion installations in 20 places.
- Use 125% safety factor for all welds, electric weld with 3/32 Fleetwood 3T Rod. Weld all places possible at junctions of tube and plates. Welded assemblies may be painted for appearance and corrosion protection.
- Grind welds flush on top and bottom surfaces of seat base weldment.
Parts:
[1]. Frame, Assembly
[2]. Frame, Front and Side Assembly
[3]. Frame, Bottom Assembly
[4]. Frame, Seat Top Assembly
[5]. Frame, Back Assembly
[10]. Shoulder Bolt, 1/2 SOC. HD Bolt. See detail A.
[11]. Bearing (4 places)
[12]. HEX Head Bolt, 3/8-16 NC-2 X 2-1/2 LG
[13]. HEX Nut, 3/8-16 NC-2
[14]. HEX Head Bolt, 3/8-16 NC-2 X 3-1/2 LG
[15]. Round HD Screw, 1/4-20 NC-2 X 2
[16]. HEX Nut, 1/4-20 NC-2
[17]. Round HD Screw, 1/4-28 NF-2-1-1/2 LG
[18]. HEX Nut, 1/4-28 NF-2
[19]. Outboard Belt Anchor Bracket, steel, 2 X 2 X 2.25 X 3
[20]. Inboard Belt Anchor Bracket, steel, 1/4 X 1-1/4 X 3-1/4
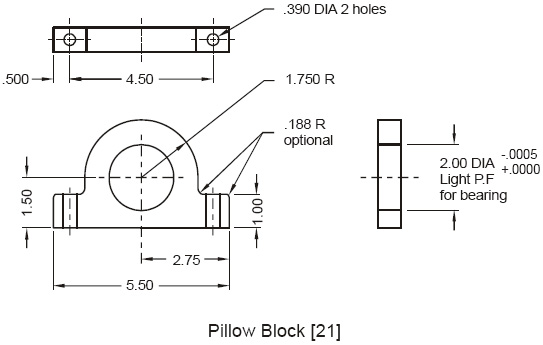
[21]. Pillow Block, steel
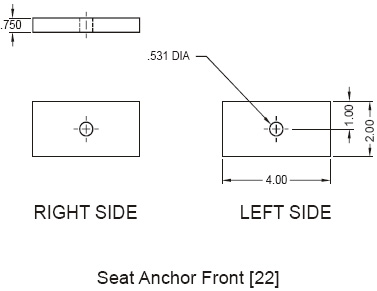
[22]. Seat Anchor Front, steel
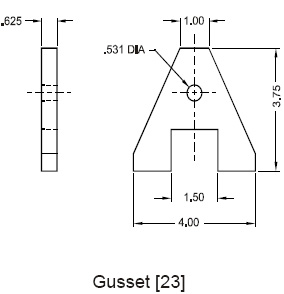
[23]. Gusset, steel
[24]. Steel Plate
[25]. Pivot Block, steel
[26]. Seat Anchor Back, steel
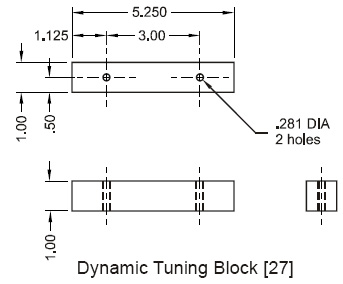
[27]. Dynamic Tuning Block, steel
[28]. Rigid Rod, 1045 Cold Rolled steel
[29]. Rod, steel
2010SSA201 - Frame, Front and Side Assembly
- Dimensions in mm except for welds, which are in inches.
- Drawing is not to scale.
- Use 125% safety factor for all welds, electric weld with 3/32 Fleetwood 3T Rod. Weld all places possible at junctions of tube and plates. Welded assemblies may be painted for appearance and corrosion protection.
- Grind welds flush on top and bottom surfaces of seat base weldment.
Parts List:
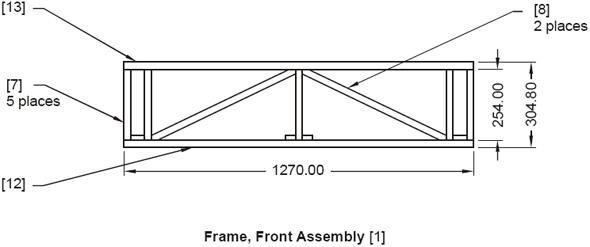
[1]. Frame, Front Assembly
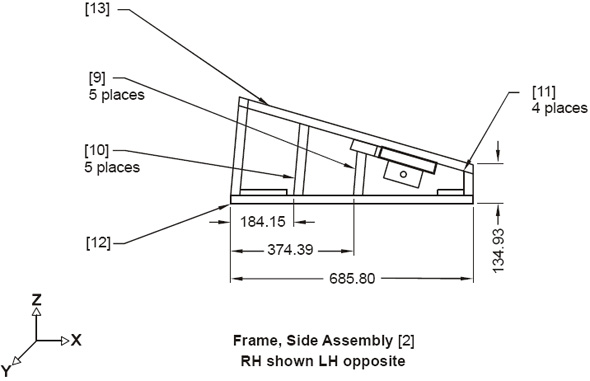
[2]. Frame, Side Assembly
[7]. Tubing, steel, 15ga. 1 sq. cut lg. = 254.00 mm
[8]. Tubing, steel, 15ga. 1 sq. cut lg. = 558.80 mm
[9]. Tubing, steel, 15ga. 1 sq. cut lg. = 139.70 mm
[10]. Tubing, steel, 15ga. 1 sq. cut lg. = 165.10 mm
[11]. Tubing, steel, 15ga. 1 sq. cut lg. = 92.07 mm
[12]. Frame, Bottom Assembly
[13]. Frame, Seat Top Assembly
2010SSA202 - Frame, Bottom Assembly
- Dimensions in mm except for welds, parts, diameters which are in inches.
- Drawing is not to scale.
- Use 125% safety factor for all welds, electric weld with 3/32 Fleetwood 3T Rod. Weld all places possible at junctions of tube and plates. Welded assemblies may be painted for appearance and corrosion protection.
- Grind welds flush on top and bottom surfaces of seat base weldment.
Parts List:
[1]. Frame, Bottom Assembly
[6]. Inboard Belt Anchor Bracket
[7]. Seat Anchor Front
[8]. Gusset
[9]. Steel Plate
[10]. Seat Anchor Back
[11]. Tubing, steel, 15ga. 1 sq. cut lg. = 762.00 mm
[12]. Tubing, steel, 15ga. 1 sq. cut lg. = 685.80 mm
[13]. Tubing, steel, 15ga. 1 sq. cut lg. = 1270.00 mm
[14]. Tubing, steel, 15ga. 1 sq. cut lg. = 552.45 mm
[15]. Tubing, steel, 15ga. 1 sq. cut lg. = 50.80 mm
[16]. Tubing, steel, 15ga. 1 sq. cut lg. = 1066.80 mm
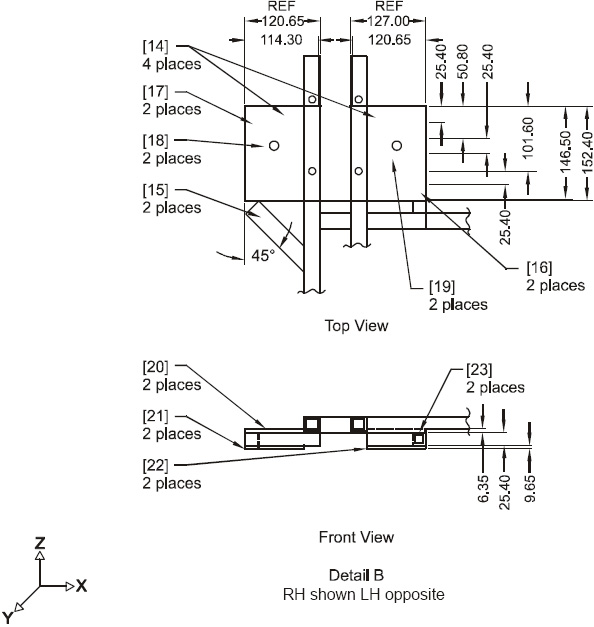
2010SSA203 – Frame, Seat Top Assembly
Notes:
- Dimensions in mm except for welds, parts, diameters which are in inches.
- Drawing is not to scale
- Use 125% Safety Factor for all welds, electric weld with 3/32 Fleetwood 3T Rod. Weld all places possible at junction of tube and plates. Welded assemblies may be painted for appearance and corrosion protection.
- Grind welds flush on top and bottom surfaces of seat base weldment.
- .265 DIA holes shall be drilled in Frame, Seat Top Assembly [1] for attachment of Cushion, Seat Assembly in 6 places.
Parts List:
[1]. Frame, Seat Top Assembly
[6]. Tubing, steel, 15ga. 1 sq. cut lg. = 1270.00 mm
[7]. Tubing, steel, 15ga. 1 sq. cut lg. = 558.80 mm
[8]. Tubing, steel, 15ga. 1 sq. cut lg. = 1130.30 mm
[9]. Tubing, steel, 15ga. 1 sq. cut lg. = 1066.80 mm
[10]. Tubing, steel, 15ga. 1 sq. cut lg. = 660.40 mm
[11]. Tubing, steel, 15ga. 1 sq. cut lg. = 165.10 mm
[12]. Tubing, steel, 15ga. 1 sq. cut lg. = 50.80 mm
[13]. Tubing, steel, 15ga. 1 sq. cut lg. = 635.40 mm
[14]. Tubing, steel, 15ga. 1 sq. cut lg. = 95.25 mm
[15]. Tubing, steel, 15ga. 1 sq. cut lg. = 171.45 mm
[16]. Tubing, steel, 15ga. 1 sq. cut lg. = 247.65 mm
[17]. Bar, steel, 1 X 1, cut lg. = 165.10 mm
[18]. Bar, steel, 1 X 1, cut lg. = 95.25 mm
[19]. Bar, steel, 1 X 1, cut lg. = 101.60 mm
[20]. Plate, steel, 1/4 X 3.75 X 6 in
[21]. Plate, steel, 3/8 X 4.75 X 6 in
[22]. Plate, steel, 3/8 X 5 X 5.75 in
[23]. Plate, steel, 1/4 X 4 X 5 in
2010SSA204 – Anchor Points Assembly
Notes:
- Dimensions in mm except for welds, parts, diameters which are in inches.
- Drawing is not to scale.
- Use 125% Safety Factor for all welds, electric weld with 3/32 Fleetwood 3T Rod. Weld all places possible at junctions of tube and plates. Welded assemblies may be painted for appearance and corrosion protection.
- Grind welds flush on top and bottom surfaces of seat base weldment.
- Lower Universal Anchor Bars: 6 mm DIA, 25 mm length, located 102 mm forward of point Z and 323 mm upward from floor.
- .531 DIA holes 6 places for Seat Base Attachment to test fixture.
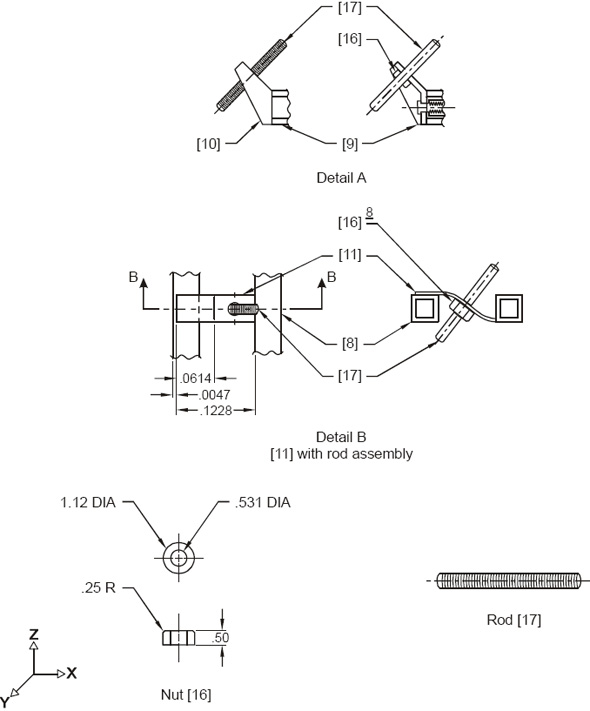
- 1/2 Threaded Rod [17] is recommended with Belt Clevis and Nut [16] to simplify belt tensioning adjustment at both Inboard and Outboard Belt Anchors.
- 2 Nuts [16] are required to be used with Inboard Belt Anchor Bracket [11]. If the Outboard Belt Anchor Bracket [10] is used, 2 more Nuts [16] are required.
- Maximum distance from the seat bight to the end of the belt buckle is 175 mm.
Parts List:
[1]. Anchor Points Assembly
[6]. Frame, Front Assembly
[7]. Frame, Side Assembly
[8]. Frame, Bottom Assembly
[9]. Frame, Seat Top Assembly
[10]. Outboard Belt Anchor Bracket
[11]. Inboard Belt Anchor Bracket
[12]. Seat Anchor Front
[13]. Gusset
[14]. Steel Plate
[15]. Seat Anchor Back
[16]. Nut, steel, 1-1/8 DIA X 1/2 TK.
[17]. Rod, Threaded Rod, 1/2 DIA
2010SSA205 – Frame, Back Assembly
Notes:
- Dimensions in mm except for parts, diameters, and welds, which are in inches.
- Drawing is not to scale.
- Use 125% Safety Factor for all welds, electric weld with 3/32 Fleetwood 3T Rod. Weld all places possible at junctions of tube and plates. Welded assemblies may be painted for appearance and corrosion protection.
- Grind welds flush on top and bottom surfaces of seat base weldment.
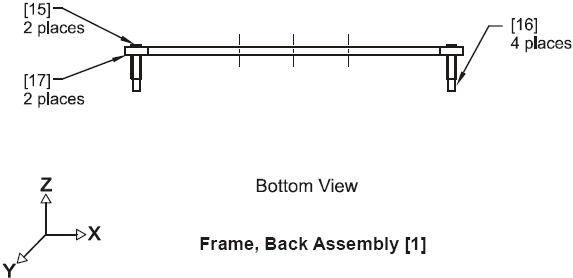
- .265 DIA holes shall be drilled 15 places in Frame, Back Seat Assembly [1] for attachment of Cushion, Back Assembly.
- Slotted holes shall be placed in the back of Frame, Back Assembly [1] for attachment of Dynamic Tuning Block, 4 places. See Detail B.
Parts List:
[1]. Frame, Back Assembly
[6]. Tubing, steel, 15ga. 1 sq. cut lg. = 1276.35 mm
[7]. Tubing, steel, 15ga. 1 sq. cut lg. = 749.30 mm
[8]. Tubing, steel, 15ga. 1 sq. cut lg. = 622.30 mm
[9]. Tubing, steel, 15ga. 1 sq. cut lg. = 1143.00 mm
[10]. Tubing, steel, 15ga. 1 sq. cut lg. = 641.35 mm
[11]. Tubing, steel, 15ga. 1 sq. cut lg. = 69.85 mm
[12]. Tubing, steel, 15ga. 1 sq. cut lg. = 127.00 mm
[13]. Tubing, steel, 15ga. 1 sq. cut lg. = 196.85 mm
[14]. Bar, steel, 1 X 1, cut lg. = 88.90 mm
[15]. Plate, steel, 1/4 X 1 X 6.50 in
[16]. Plate, steel, 1/4 X 5 X 6.00 in
[17]. Rod, steel, 1 DIA lg. = 4.00 in
2010SSA300 – Cushion, Assembly
Notes:
- Foam shall measure 54 X 24 X 6 inches. One or two pieces of foam may be used to achieve required dimension.
- To be suitable for compliance testing, foam inserts shall compress 25% under the following load limits:
51 mm (2 in) thick foam: 20.4 to 24.9 kg (45 to 55 lbs)
102 mm (4 in) thick foam: 9.5 to 12.2 kg (21 to 27 lbs)
Parts List:
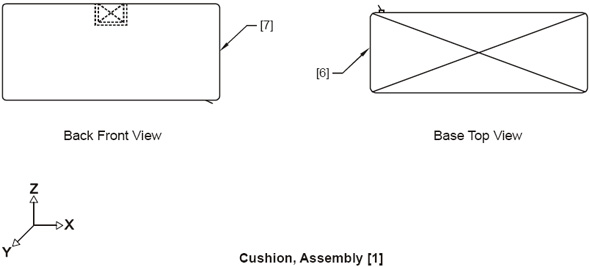
[1]. Cushion, Assembly
[6]. Cushion, Seat Assembly
[7]. Cushion, Back Assembly
| SPECIFICATIONS, SEATING FOAM POLYURETHANE | FOAM A | FOAM B | |
|---|---|---|---|
| DESCRIPTION | EXTRA FIRM HIGH DENSITY GRADE | MEDIUM SOFT GRADE | |
| DENSITY – PCF | 2.70 ± .10 | ||
| *INDENT LOAD – LBS. – 4 THK @ 25% DEFLECTION | 45 – 55 | 21 – 27 | |
| INDENT LOAD RATIO (65/25) – MIN | 2.0 | 1.9 | |
| TENSILE – PSI – MIN | 12 | 12 | |
| ELONGATION - % - MIN | 175 | 175 | |
| TEAR RESISTANCE – LBS/IN – MIN | 1.75 | 1.75 | |
| COMPRESSION SET | METHOD B – ORIGINAL – 50% MAX | 15.0 | |
| 22 HRS. @ 58o F – 90% - MAX | 20.0 | ||
| HUMIDITY AGED 5 HRS. @ 250o F | 50% MAX | 20.0 | 20.0 |
| 90% MAX | 20.0 | ||
* AS PER METHOD B1 OF ASTM STANDARD d3574-08 Standard Test Methods for Flexible Cellular Materials—Slab, Bonded, and Molded Urethane Foams
| FOAM POSITION | FOAM TYPE | X | Y | Z |
|---|---|---|---|---|
| SEAT BACK LOWER (AGAINST PLYWOOD BACKING) | A | 24 | 54 | 2 |
| SEAT BACK UPPER | B | 24 | 54 | 4 |
| SEAT BASE LOWER (AGAINST PLYWOOD BACKING) | A | 20 | 54 | 2 |
| SEAT BASE UPPER | B | 20 | 54 | 4 |
2010SSA301 – Cushion, Seat Assembly
Notes:
- Dimensions in mm except for parts which are in inches.
- Drawing is not to scale.
- Punch 6 holes .28 DIA on back of [6] to allow protrusion of screws (match to Backing, Seat Assembly).
- [6] shall be elastic back automotive upholstery vinyl.
- [10] shall be 100 inches long and run around 3 sides of [6].
- Stitching as described in ASTM D6193-09 Standard Practice for Stiches and Seams, stitch type 301, 6 to 8 SPL.
Parts List:
[1]. Cushion, Seat Assembly
[6]. Cover, Cushion
[7]. Foam, Cushion
[8]. Backing, Cushion .38 plywood
[9]. Thread, (stitching) V-T-295-E
[10]. Slide Fastener VF-106
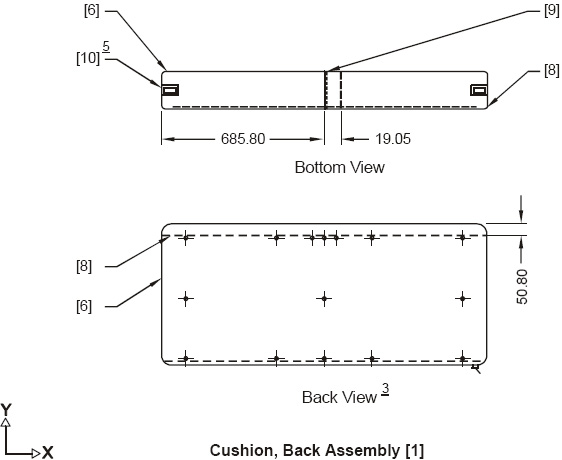
2010SSA302 – Cushion, Back Assembly
Notes:
- Dimensions in mm except for parts which are in inches.
- Drawing is not to scale.
- Punch 15 holes .28 DIA on back of [6] to allow protrusion of screws.
- [6] shall be elastic back automotive upholstery vinyl.
- [10] shall be 100 inches long and run around 3 sides of cover.
- Stitching as described in ASTM D6193-09 Standard Practice for Stiches and Seams, stitch type 301, 6 to 8 SPI.
Parts List:
[1]. Cushion, Back Assembly
[6]. Cover, Cushion; Vinyl; Automotive upholstery
[7]. Foam, Cushion
[8]. Backing, Cushion .38 plywood
[9]. Thread, (stitching) V-T-295-E
[10]. Slide Fastener VF-106
[11]. Grommets
2010SSA303 – Backing, Seat and Back Assembly
Notes:
- Dimensions in mm except for parts and diameters, which are in inches.
- Drawing is not to scale.
- It is recommended that the Frame, Seat Top Assembly be used as a template to drill holes. [1] shall be clamped in position on Frame, Seat Top Assembly, in order to drill holes to match. Use a .281 DIA hole or a size for light press fit to the neck of the "T" Nut [11].
- It is recommended that the Frame, Back Assembly be used as a template to drill holes. [1] shall be clamped in position on Frame, Seat Top Assembly, in order to drill holes to match. Use a .281 DIA hole or a size for light press fit to the neck of the "T" Nut [11].
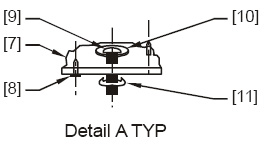
- [9] shall be securely fastened to Backing, Seat Assembly [1] and Backing, Back Assembly [2] as shown in Detail A. The neck of [11] shall not exceed the thickness of Backing [7].
- See Detail A for typical view showing nails [8] and "T" Nut Assembly [9] used to secure Foam to Backing [7] and to attach [7] to Frame, Seat Top Assembly and Frame, Back Assembly.
- Remove all sharp edges of Backing [7] to avoid tearing Vinyl Cover. A .50 radius shall be typical for corners of [7].
- Nails [8] shall be driven THRU from underside of Backing [7] to maintain Foam in position during impact.
Parts List:
[1]. Backing, Seat Assembly
[2]. Backing, Back Assembly
[7]. Backing, Cushion, .38 plywood
[8]. Nails, Flat Head, .750 Long
[9]. “T” Nut Assembly
[10]. Washer, Fender, 1.00 O.D.
[11]. "T" Nut, .25-20 NC X .38 Thick
