
On this page
- 1 Introduction
- 2 Initial registration
- 2.1 Sign up for GCKey
- 2.2 Sign into the TC CID platform.
- 2.3 Sign in with a Sign-in Partner
- 2.4 Input the primary contact
- 2.5 Register with a CRA business number
- 2.6 Register without a CRA business number
- 2.7 Add a secondary contact
- 2.8 Sign in as secondary contact via email invitation
- 2.9 Add NAICS code(s)
- 2.10 Organization summary
- 2.11 Add a site
- 2.12 Add DG activity type(s)
- 2.13 Add mode(s) of transportation
- 2.14 Add class/division
- 2.15 Attest your site
- 2.16 Organization and site attestation
- 3 In-year updates
- 4 Annual Renewal
- 4.1 Organization data requirements are up to date
- 4.2 All existing sites, and site information requirements are up to date
- 4.3 All new sites, and subsequent information, have been added
- 4.4 All sites that were active, and that are now inactive, have been deactivated
- 4.5 All sites that were inactive, and are now active, have been reactivated
- 4.6 All sites that were part of a sale or merger, have been actioned as sold or merged
- 5 Contact
- 6 Appendix A – Bulk site upload
- 7 Appendix B – Classes/divisions and compatibility groups
- 8 Appendix C – Definitions and terminology
- 9 Appendix D – Related documents
1 Introduction
1.1 Overview
Public safety depends on Transport Canada (TC) knowing who is importing, offering for transport, handling, or transporting (hereafter referred to as dangerous goods (DG) activities) dangerous goods in Canada, what, when, and how, so we can mitigate risks. In response to recommendations from the Office of the Auditor General of Canada, TC is introducing new regulatory Site Registration Requirements through the Client Identification Database (CID) for persons or organizations involved in DG activities to register and share information about their activities.
For more detailed information, please visit the Canada Gazette, Part II Volume 157, Number 22
This user guide contains step-by-step instructions and references to assist you in registering your organization and its related DG activities.
There are three key stages to updating the TC CID Platform:
- Initial Registration occurs once within one (1) year of CID going live. An organization’s contacts and details are entered for the first time and an anniversary date is established
- In-Year Update is a re-occurring activity throughout the year on an as needed basis. The administrative changes to the organization must be updated within 60 days of a change.
- Annual renewal is a re-occurring activity conducted within 30 days of the anniversary date of the initial registration.
1.2 Who must register?
If you or your organization imports, offers for transport, handles, or transports dangerous goods in Canada, you may have to register.
Persons who will not be required to register areFootnote 1:
- those handling dangerous goods originating from outside Canada, and passing through Canada to a destination also outside of Canada;
- those conducting cross border movements that do not have headquarters, or that do not operate a site in Canada;
- those operating one or multiple oil wells;
- those who are currently exempt under special cases of the Transportation of Dangerous Goods Regulations (TDGR), except for Section1.16 (500 Kg Gross Mass Exemption); and
- those conduct DG activities at a site that are in quantities necessary for a federal, provincial or municipal officer to carry out their duties with respect to the enforcement of federal, provincial or municipal law.
You can use the questionnaire as a guideline to whether you should register or not. However, they are not a substitute for reading and understanding the following rules and regulations.
- Transportation of Dangerous Goods Act, 1992 (TDG Act)
- Transportation of Dangerous Goods Regulations (TDG Regulations)
1.3 About this document
TC's CID Platform utilizes the Microsoft Dynamics 365 customizable interface to gather and house the Client Identification Database information.
1.4 Before you register
Before you register you will need to decide on a secure sign-in method, either GCKey or via an online banking partner. Learn more about your sign-in options.
You will also need to gather your organization's:
- Canadian Revenue Agency (CRA) business number, if applicable;
- legal and operating name;
- corporate address;
- the name, email, and phone number of the primary contact which could be the organization's owner, or of someone with permission to act on their behalf;
- the name, email, and phone number of a back-up (secondary) contact person; and
- NAICS Codes, if applicable North American Industry Classification System (NAICS) Code(s).
You will also need this information for each site you want to register:
- the site's addresses (street address, legal land description, or latitude/longitude);
- Note: the platform uses address 1, address 2, address 3 to ensure each site is unique;
- Address 1 is street address;
- Address 2 can be unit number or floor number;
- Address 3 can be used to differentiate various organizations that are engaged in DG activities at same location (i.e., public health laboratory locations, airport terminals, etc.)
- Note: the platform uses address 1, address 2, address 3 to ensure each site is unique;
- the DG activities at the site;
- the modes of transportation at the site; and
- the classes and divisions of the dangerous goods at the site.
1.5 Supported browsers
Google Chrome is the recommended Web browser for CID. If you use CID with Microsoft Edge, the display may differ slightly. Ensure you have the latest version of the browser software.
Note: Do not use Internet Explorer or Mozilla Firefox to access CID.
2 Initial registration
2.1 Sign up for GCKey
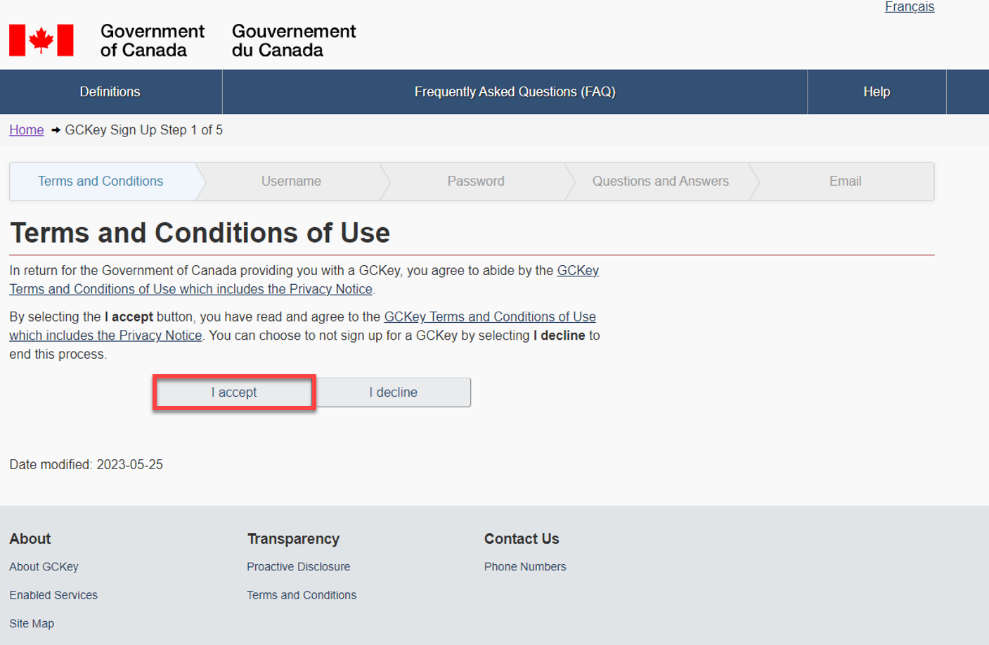
-
Once you click the link, the Welcome to GCKey page appears. Select the Sign Up button.

-
Review the text and select the I accept button.
-
Enter your username and select Continue.

-
Create and confirm your password and select Continue.

-
Create your recovery questions and select Continue.

-
Enter an optional Account Recovery email. This email will be used if your account information is forgotten or lost. Do you want to have the option to recover your account?
- If Yes, enter your email, select Continue, and proceed to the next step.
- If No, select Skip and proceed to Step 9.

-
Enter the confirmation code sent to your email and select Continue.

-
You have created your Email Recovery account. Select the Continue button.

-
You have created your GCKey account. Select the Continue button.

-
The GCKey welcome page appears. Select the Continue button. You will be prompted to sign-in.

2.2 Sign into the TC CID platform.
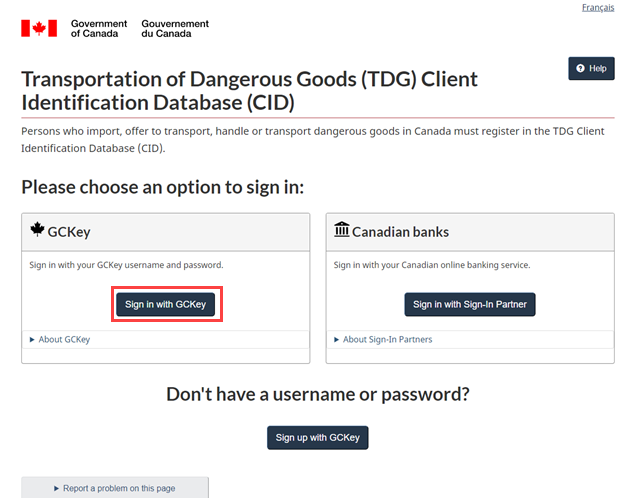
You can access the TC CID Platform using an existing GCKey or a Canadian Online Banking Service account. You also have an option to create a new GCKey that is attached to your company email, provided it is not a group email.
- The Sign In Canada page appears. Choose an option to sign in.
- If you are signing in with a GC Key, select the Sign in with GCKey button and proceed to the next step.
- If you are signing in with a Canadian online banking service, select the Sign in with Sign-In Partner button and proceed to Sign in with a Sign-In Partner.
- You can also select the Sign up with GCKey button to create a GCKey. You will need your company email address. It must not be a shared email address.
-
Enter your Username and Password and select the Sign In button.

-
The Welcome page appears. Select the Continue button.

-
The Terms and Conditions page appears. Read the terms and conditions and if you agree, place a check mark in the box provided and select the Continue button.

-
The Register your external account page appears. Enter your Primary Contact's email address and select Register.

2.3 Sign in with a Sign-in Partner
-
The Select a Sign-in Partner page appears. Select a Sign-in Partner. Enter the information required depending on your Sign-in Partner.

-
The Register your external account page appears. Enter your Primary Contact's email address and select Register.

2.4 Input the primary contact
-
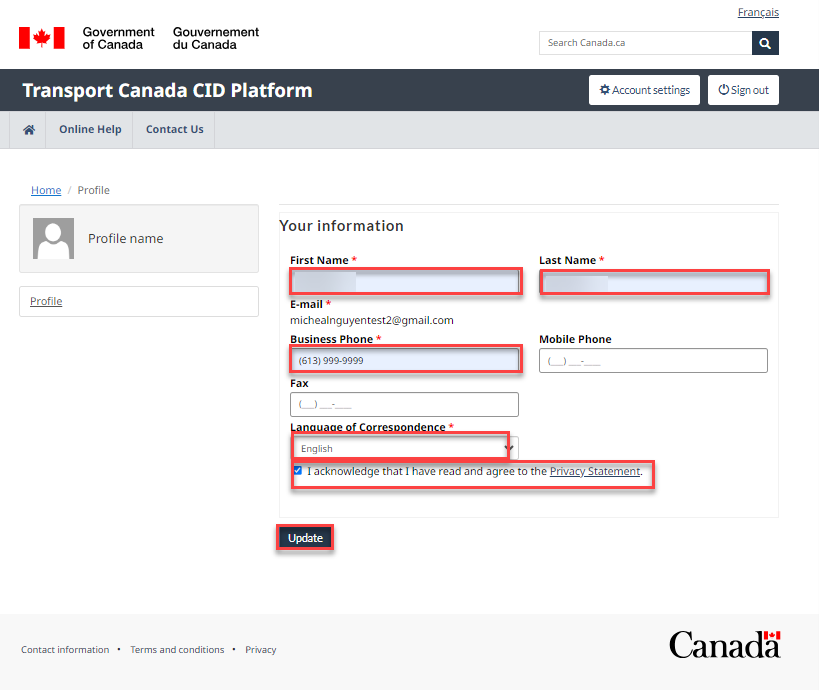
After you agree to the terms and conditions, the Primary Contact update page appears. Enter your information and select Update.
-
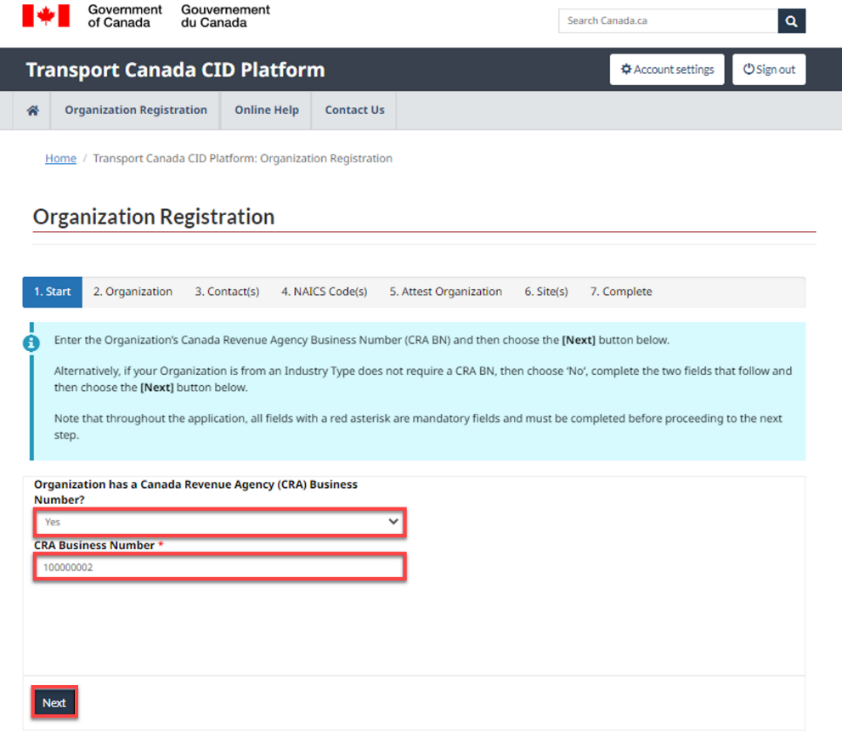
The Organization Registration page appears. Does your organization have a CRA Business Number?
- If Yes, proceed to Register with a CRA Business Number.
- If No, proceed to Register Without a CRA Business Number.

2.5 Register with a CRA business number
-
The Organization Registration page appears. Select Yes in the Organization has a CRA Business number? drop down list. Enter the CRA Business Number in the field provided. Select the Next button.
-
Review the details of the organization and select the This is my Organization button.

-
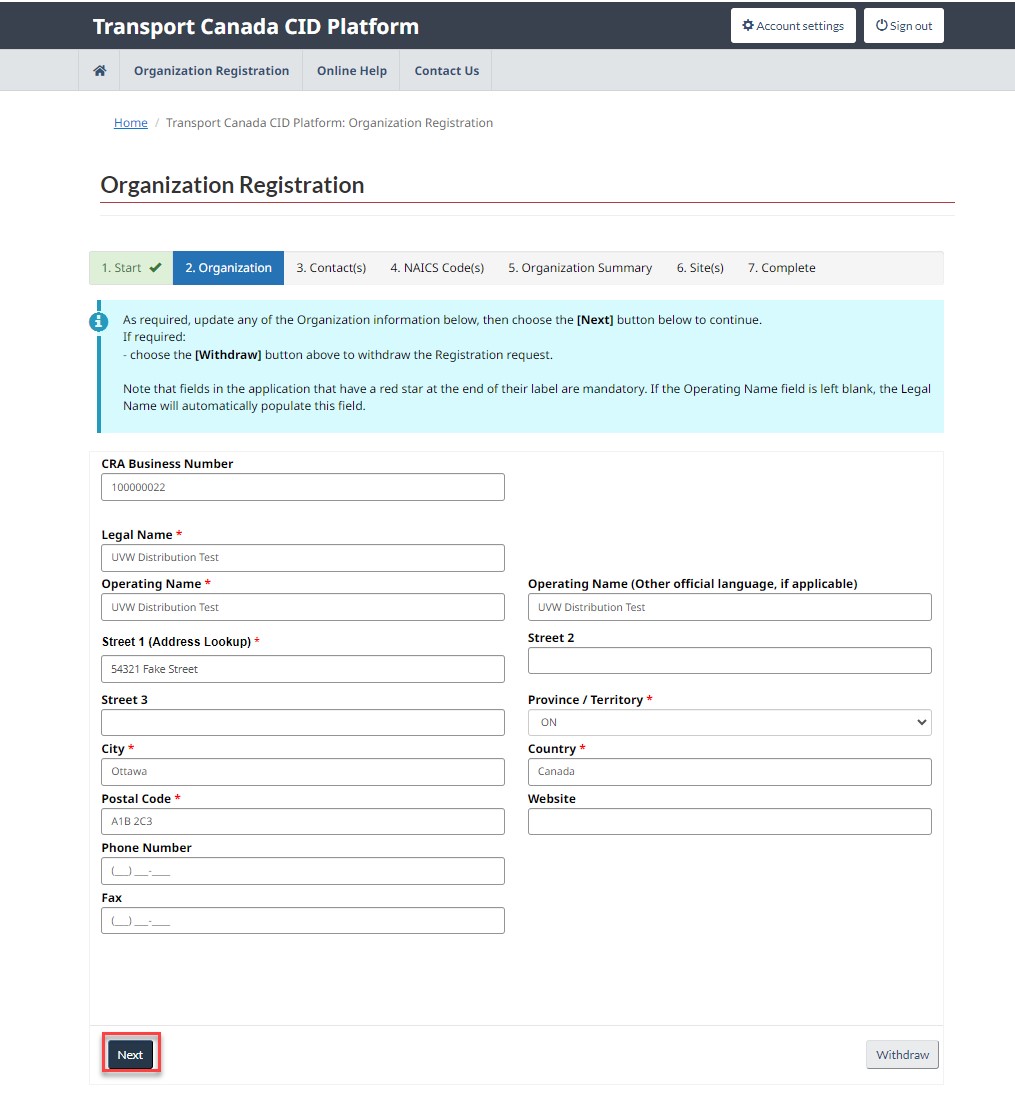
The Organization page appears, with most of the information prepopulated. Review the information and update if necessary. Select the Next button. Proceed to Add a Secondary Contact.
2.6 Register without a CRA business number
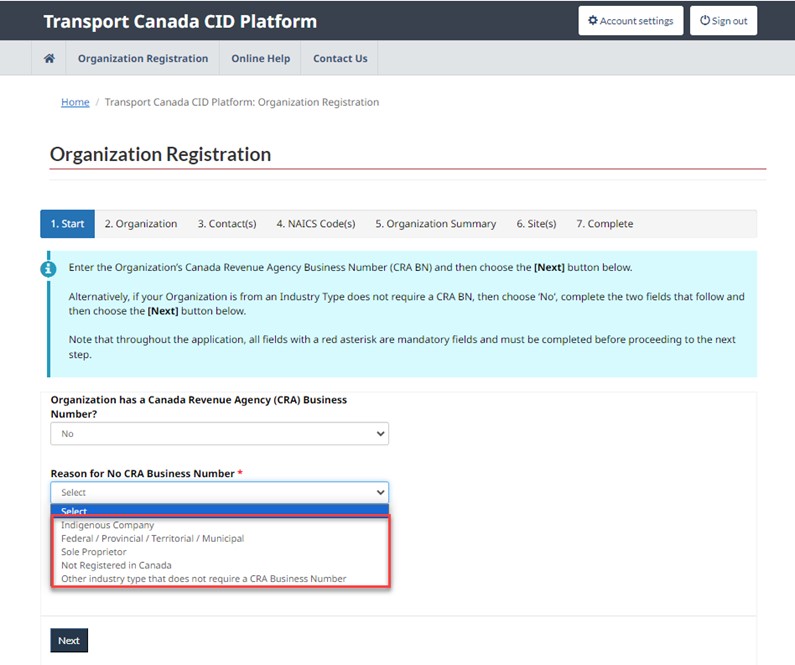
-
Select No from the Organization has a CRA Business Number? drop-down list. Select a Reason for No CRA Business Number from the drop-down list. Enter the Legal Name of your organization.

-
Select one (1) of the five (5) options as the reason for no CRA business number. If Other industry type that does not require a CRA Business Number is selected, enter a description for your industry type. Select Next to continue.
-
The Organization Registration page appears. Update the mandatory organization information. Upon entering an address for Street 1, a lookup list will appear with suggested addresses. Selecting an address will auto-populate all mandatory fields. Select Next and proceed to Add a Secondary Contact.

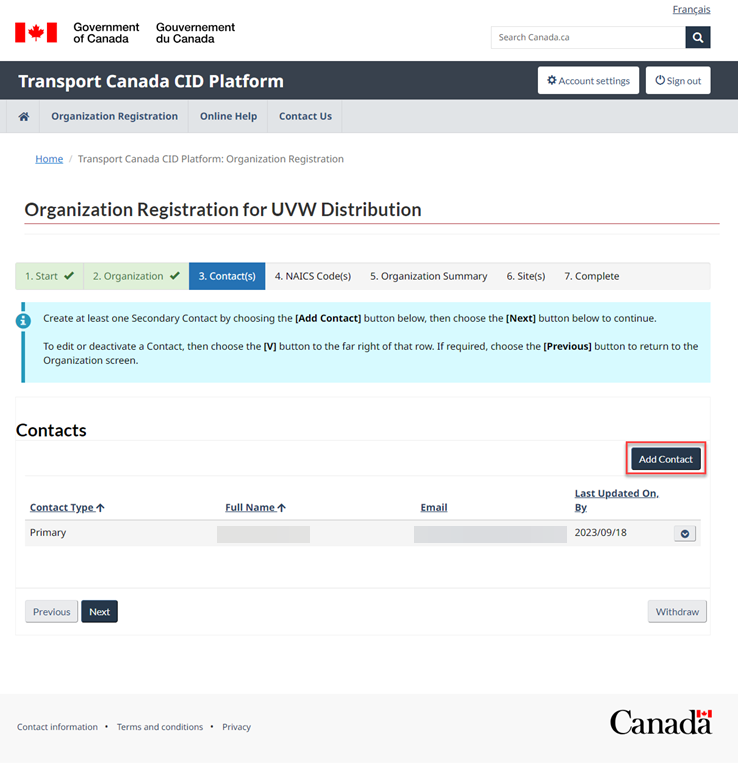
2.7 Add a secondary contact
-
You cannot proceed without adding a secondary contact. If you try to select the Next button you will get a warning message indicating that you cannot proceed without adding at least one (1) secondary contact.

-
The Contacts page appears. Select the Add Contact button to add a Secondary contact.
-
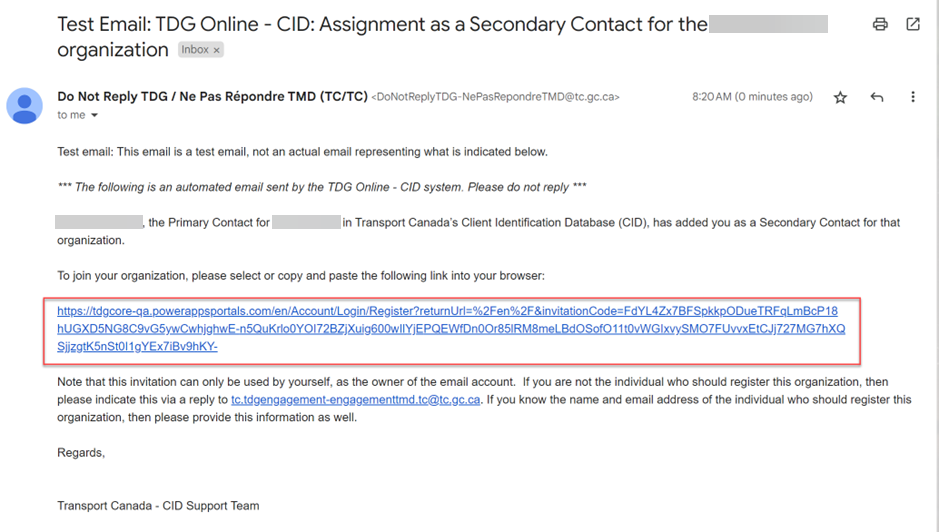
Update the Secondary Contact information and agree to the Privacy Statement by selecting the checkbox. Select the Submit button.

-
A message appears indicating that the Secondary Contact has been sent an on-boarding invitation to their email address. Select the OK button. Select the Next button.

2.8 Sign in as secondary contact via email invitation
Use this procedure if you receive an email invitation to sign on to the TC CID Platform.
-
Follow the link provided in the email.
-
You will be redirected to the GCKey page. Refer to the Sign Up for GCKey section for additional instructions.

2.9 Add NAICS code(s)
Note this is an optional step. You do not have to add a NAICS code.
-
The NAICS Code(s) page appears. Select the Add NAICS Code button to add your organization's NAICS code(s).

-
The Add NAICS Code dialog box appears. Enter your NAICS Code. Do you have another code to enter?
- If No, select the Submit and Close button and proceed to the next step.
- If Yes, select the Submit and Add Another button and repeat this step.

-
From the NAICS code(s) page, select the Next button.
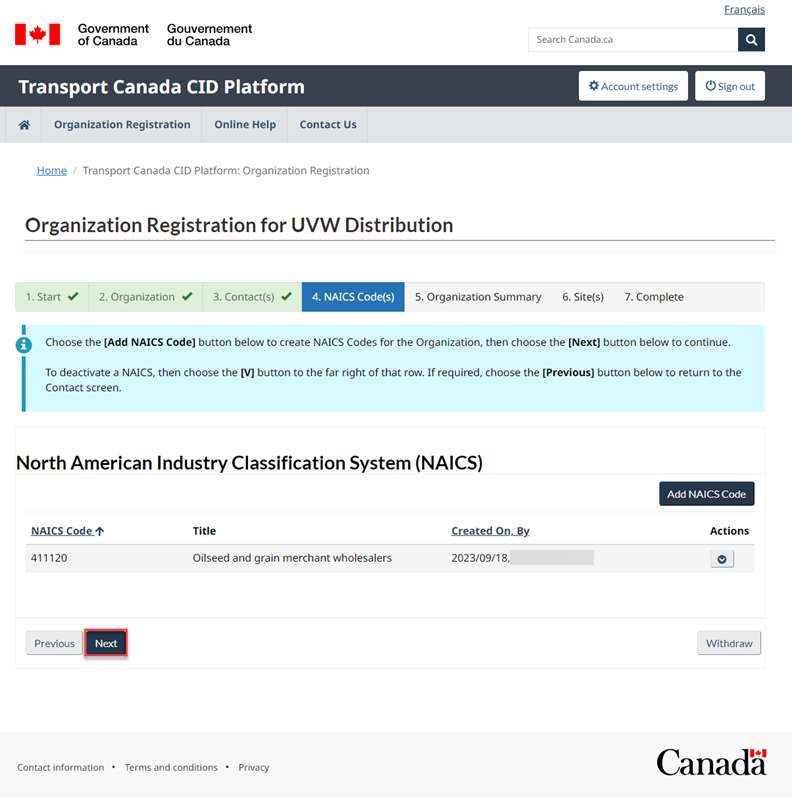
2.10 Organization summary
-
The Organization Summary page appears. Review all information. As an option, you can select the Print Summary button. Select the Submit button.

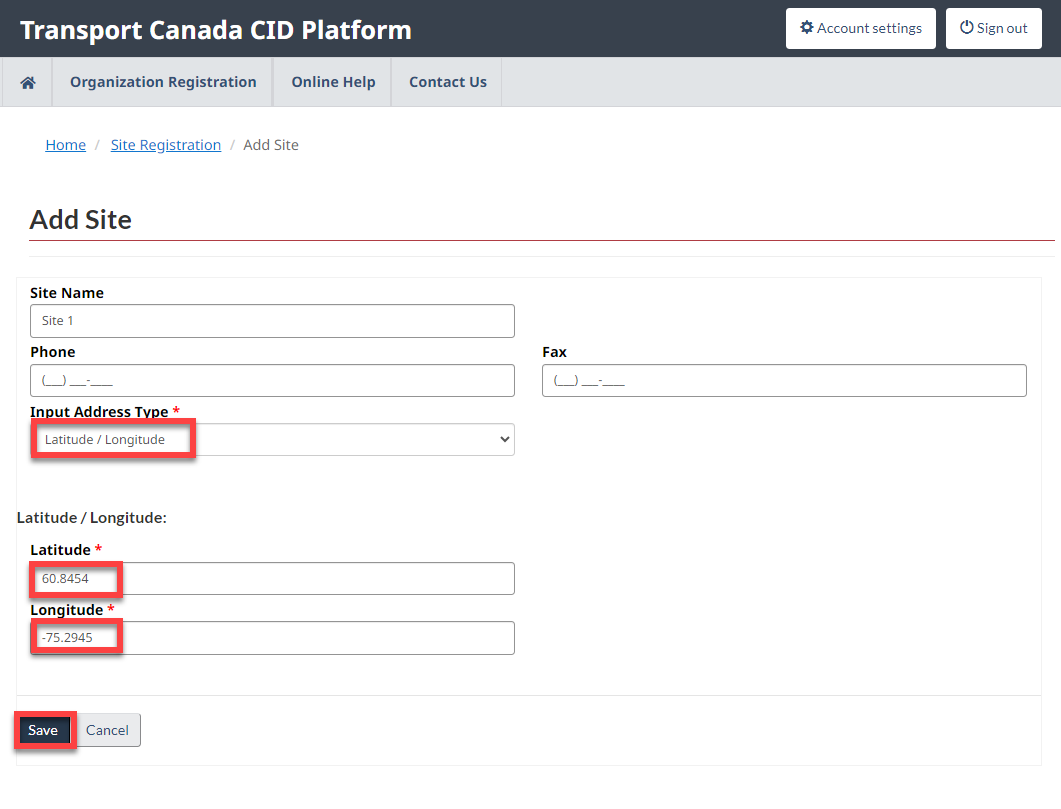
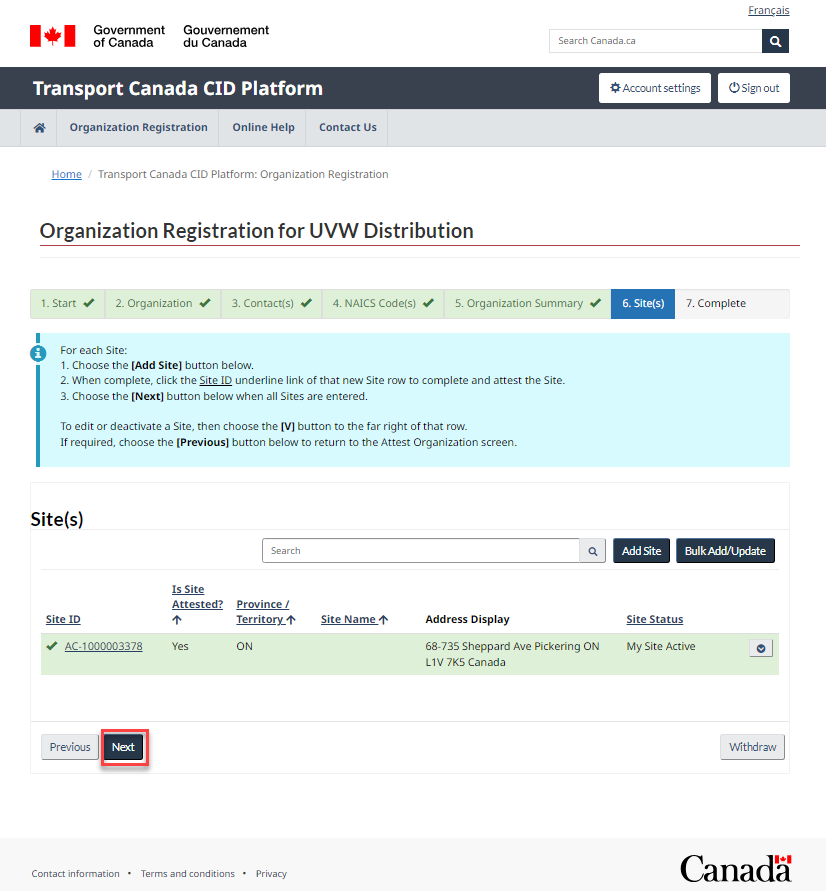
2.11 Add a site
-
The Site(s) page appears. Select the Add button to add a site individually. Optionally, you can select the Bulk Add/Update button to add multiple sites utilizing the Site Bulk Upload Workbook.

-
The Create Site page appears. Enter an optional Site Name, Phone and Fax. Does the site have a postal address for the Input Address Type?
- If Yes, add the organization information and select the Save button and proceed to Add DG Activity.
- If No, select the appropriate link for the input address type: Legal Land Description or Latitude and Longitude.
When entering the address for Street 1 , the Address Lookup will help you identify and fill in your other mandatory fields for you.
If your Site address is the same as your organization's, select Yes in the Same as the Organization address drop down list and it will automatically fill in the address fields.

-
Add a site using the Legal Land Description address type.
Note that the use of the Legal Land Description address type is limited to Manitoba, Saskatchewan, Alberta, and some parts of British Columbia.
Enter a Site Name, Phone and Fax (Optional).
Select Legal Land Description from the Input Address Type drop-down list. Complete the Legal Land Description using the drop-down lists.
Select the Save button. Proceed to Add DG Activity.

-
Add the Latitude and Longitude coordinates in the fields provided up to the 4th decimal point (e.g., 45.6789).
The Latitude must be between 40.0000 and 80.0000. The Longitude must be between -50.0000 and -150.0000.
Select the Save button. Proceed to Add DG Activity.
2.12 Add DG activity type(s)
-
The Activity Type(s) page opens. Place a check mark beside all TDG Activities that apply and select the Next button.

TDG activities mean dangerous goods (DG) activities related to the transportation of dangerous goods, such as importing, offering for transport, handling and transporting dangerous goods as per the Transportation of Dangerous Regulations.
2.13 Add mode(s) of transportation
-
The Mode(s) of Transportation page appears. Place a check mark beside all that apply and select the Next button.

2.14 Add class/division
-
The Class/Division page appears. Select the Add button.

-
The Add Class pop-up appears. Select the applicable Class/Division from the drop-down list. Do you have more to list? Refer to Appendix B for more information.
- If No, select the Submit and Close Button and proceed to the next step.
- If Yes, select the Submit and Add Another button and add another, then repeat from previous step.

-
For only Class/Division 1, select the applicable Compatibility Group from the drop-down list.
For Classes/Divisions 2-6, you do not have to select a Compatibility Group.

-
Your selected Class/Division(s) and Compatibility Group(s) appears. Select the Next button.

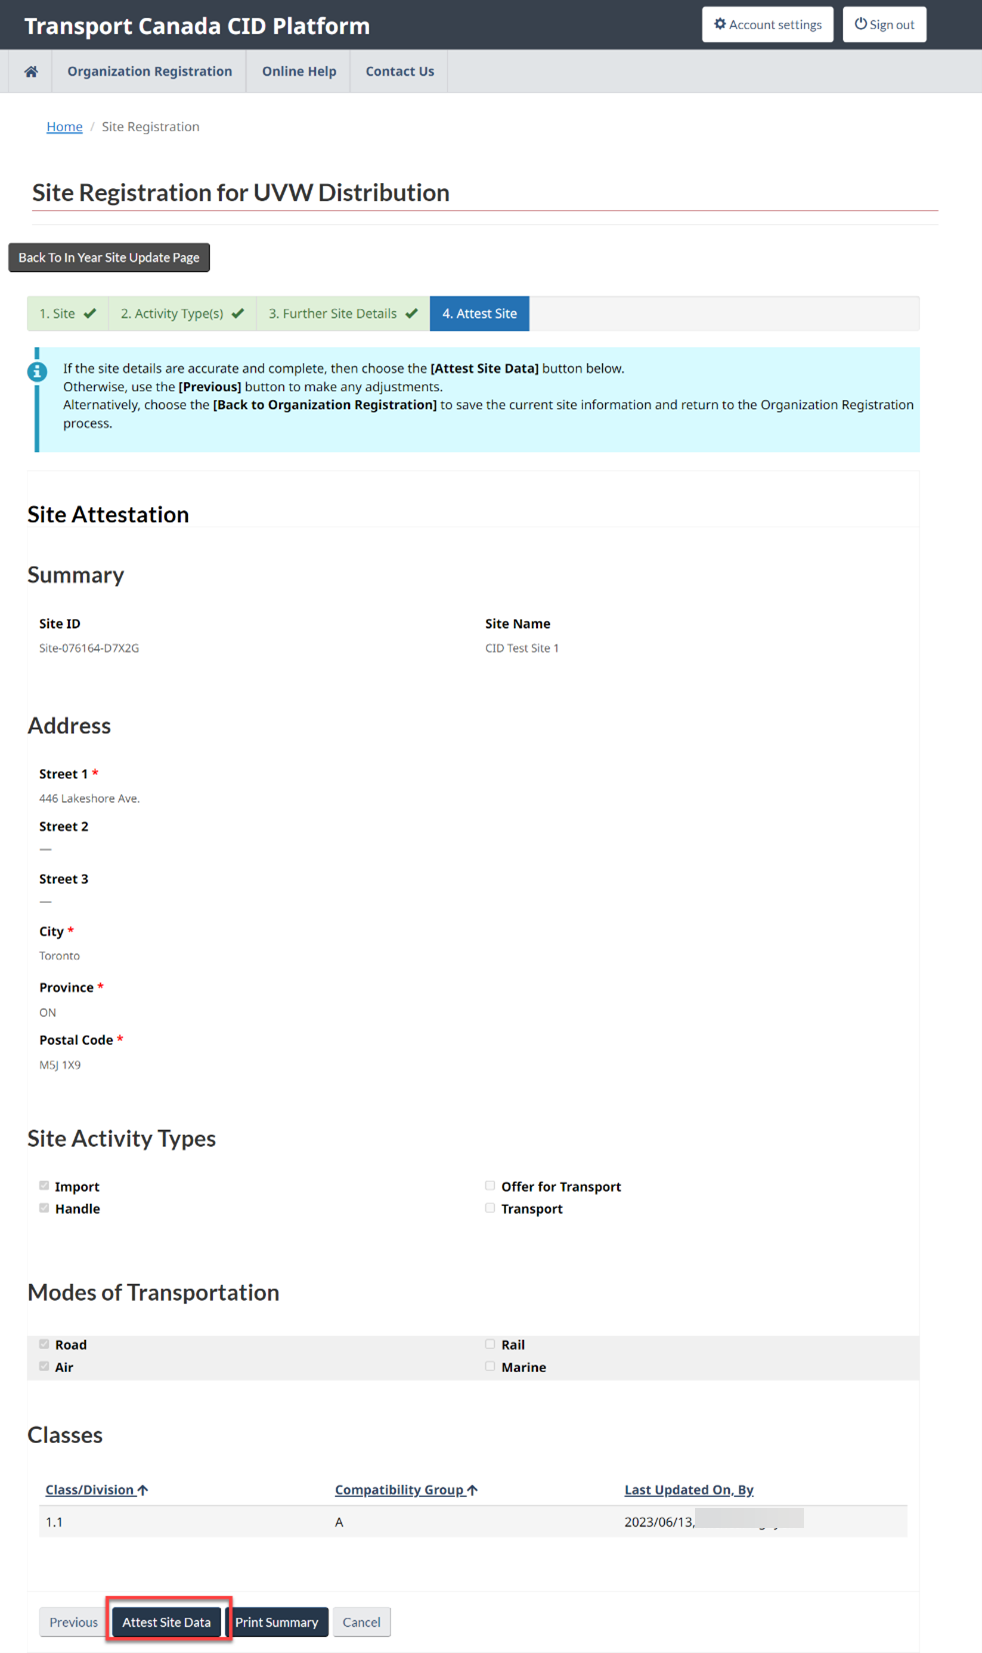
2.15 Attest your site
-
The site attestation page appears. Review all site information and select Attest Site Data. You can use the Previous button to go back to the last section to edit any information.

-
The Site page appears with your updated site. Select Next.
2.16 Organization and site attestation
-
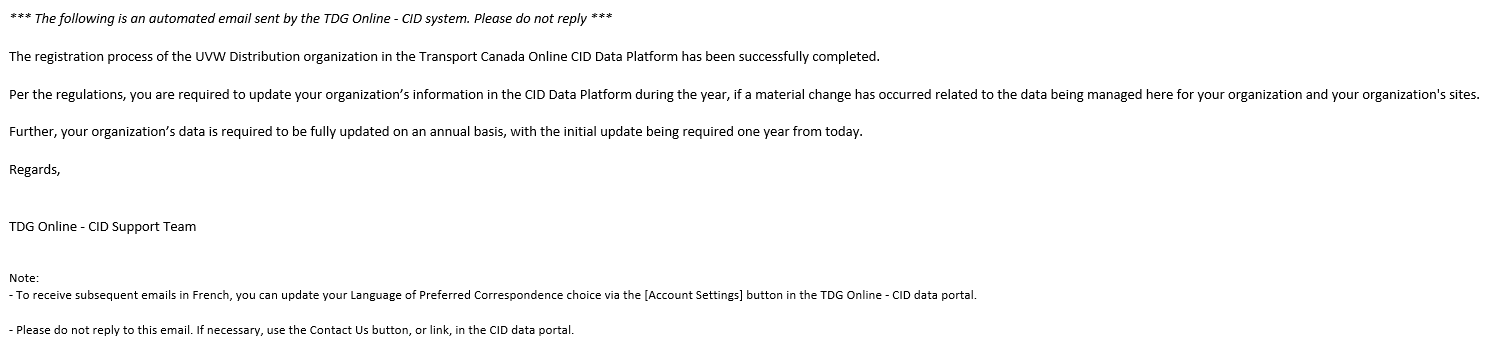
The Organization and Site Registration Details page appears. As an option select the Print Summary button. Select the Attest and Complete Registration button.

-
Your registration is now complete. Select the OK button.

-
You will receive a confirmation email that you have registered your organization.
3 In-year updates
After your initial registration, you can log in to the TC CID Platform any time during the year to review and update your organizations’ administrative information. All changes to contacts, and location information must be recorded during the year.
3.1 CID dashboard
After you have completed the Initial Registration, you will land on the CID Dashboard, from here you can review and update details about your organization and your sites.

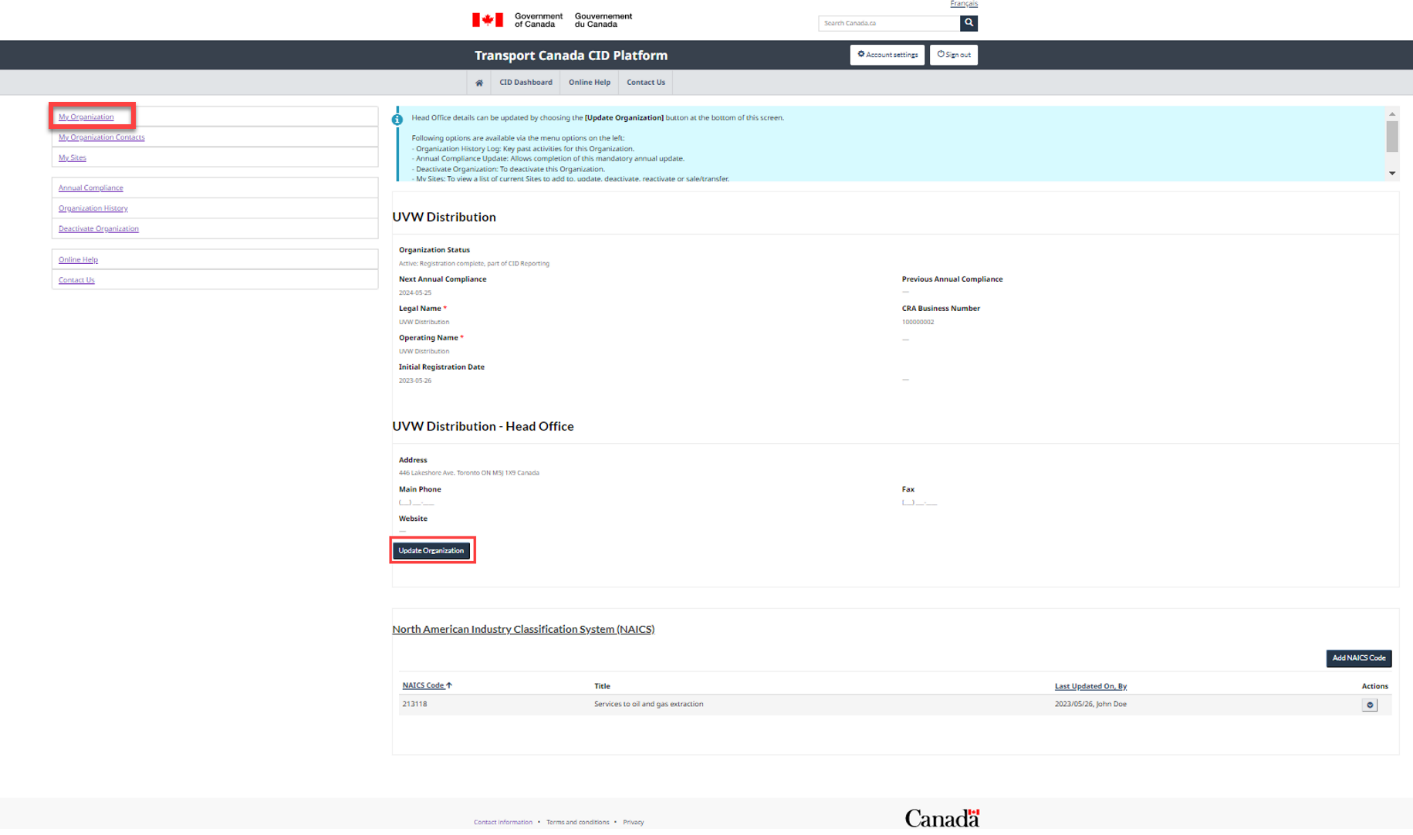
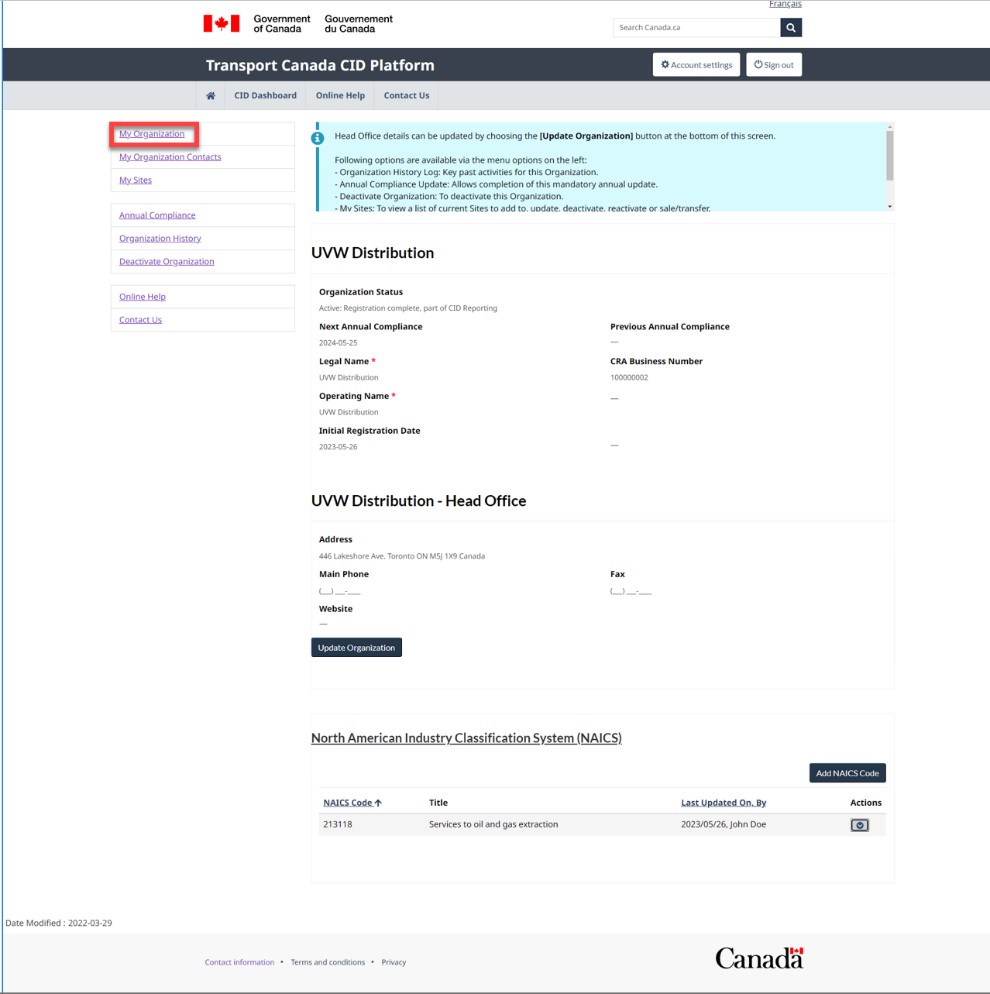
3.2 My organization
Select from the following options for instructions:
3.2.1 Update legal name, operating name, and address
-
Select My Organization from the Dashboard Menu. Select the Update Organization button.
-
Make any necessary changes and select the Update Organization button.

3.2.2 Add or deactivate NAICS code(s) (in-year)
-
Select My Organization from the Dashboard Menu. Refer to the North American Industry Classification System (NAICS) Code(s) website for more information.
-
To add a NAICS Code(s), select the Add NAICS Code button.

-
The Add NAICS Code dialog box appears. Enter the first two (2) digits of the NAICS code and select the code from the drop-down list. Do you have another code to enter?
- If No, select the Submit and Close button and proceed to next step.
- If Yes, Select the Submit and Add Another button and repeat this step.

-
If you need to deactivate a NAICS code, select the Actions drop-down list and select the Deactivate button.

-
The Deactivate dialog appears. Select Deactivate.
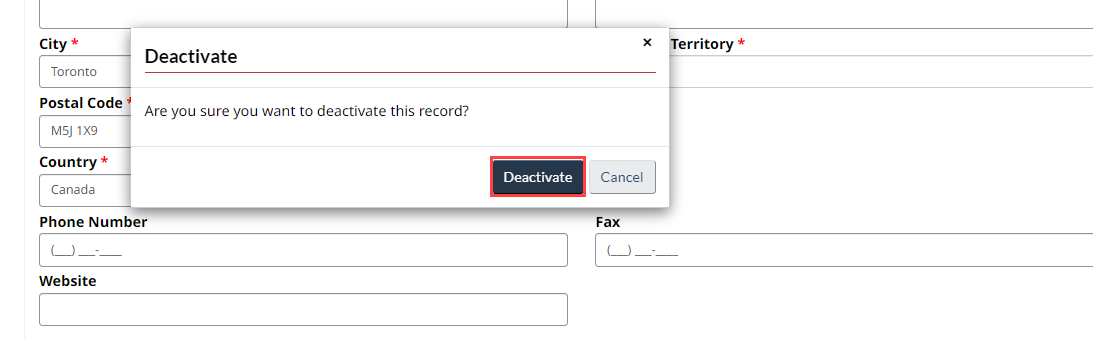
-
The NAICS code is deactivated.

3.3 My organization contacts
Select from the following options for instructions:
- Add a Contact (In-Year)
- Update Contact
- Deactivate a Contact
- Resend Invitation
- Assign as Primary Contact
3.3.1 Add a contact (in-year)
-
Select My Organization Contacts from the Dashboard Menu, select the Add Contact button.

-
The Add Contact dialog box appears. Add the contact details and select the Submit button.

-
The new contact appears on the list of contacts.

3.3.2 Update contact
-
Select My Organizations Contacts from the Dashboard Menu, select Update Contact from the Actions drop-down list.

-
The Update Contact dialog box appears. Update the applicable fields and select the Submit button.

-
An update to the Business Phone was changed as an example. Select the Submit button.
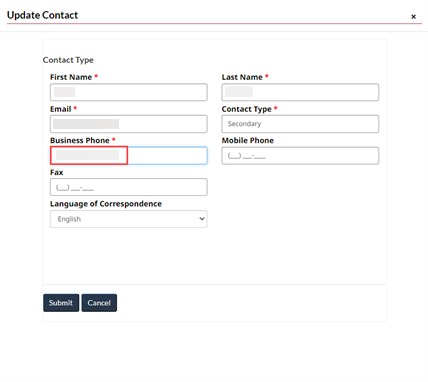
-
Select Update Contact to view the full updated information.

3.3.3 Deactivate a contact
-
Select My Organization Contacts from the Dashboard Menu. Select Deactivate from the Actions drop-down list.
Note: You must have a minimum of one (1) secondary contact.

-
A confirmation message appears. Select the Yes button.

-
The secondary contact is removed from the list.

3.3.4 Resend invitation
-
Select My Organization Contacts from the Dashboard Menu. Select Resend Invitation from the Actions drop-down list.
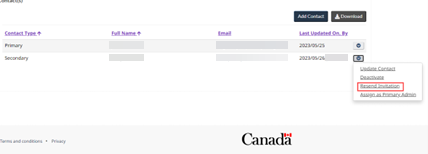
-
A confirmation message indicating an invitation has been sent appears. Select OK.

3.3.5 Assign as a primary contact
-
Select My Organization Contacts from the Dashboard Menu. Select Assign as Primary Admin button from the Actions drop-down list.
Note that this will only work if the Secondary contact has logged in at least once.
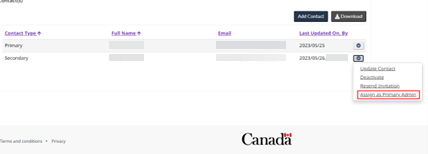
-
A confirmation message indicating the Primary and Secondary contact roles will be switched appears. Select Yes.

3.4 My sites
Select from the following options for instructions:
3.4.1 Update site information
-
Select My Sites from the Dashboard Menu. Select View/Update Site Details button from the Actions drop-down list.

-
The Site Information page appears. Select the Update Site button.

-
Update any necessary information, similar to the steps on section 2.11 Add a site.

-
After updating a site's information, the Site Attestation page appears. Select the Attest Site Data button.
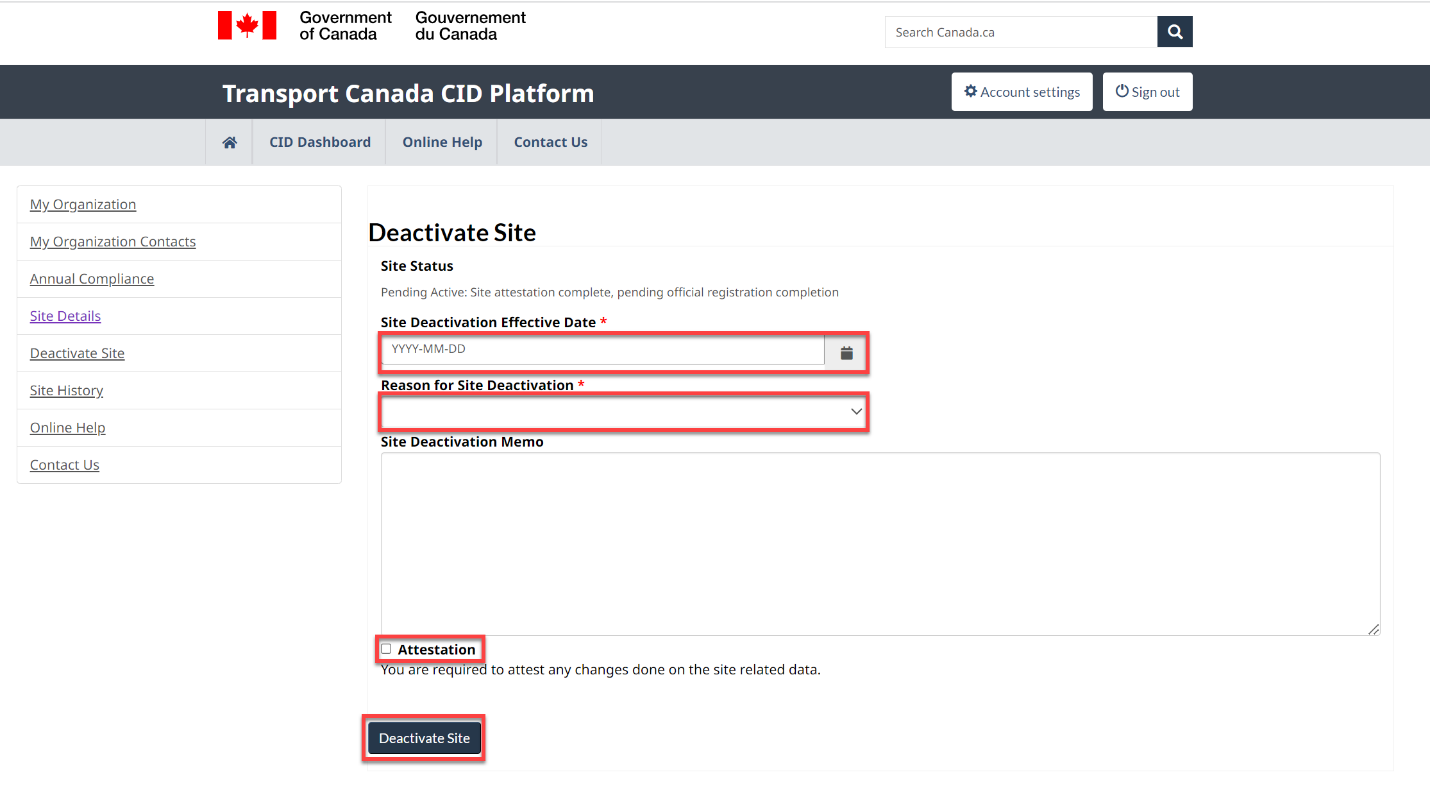
3.4.2 Deactivate a Site
-
Select My Sites from the Dashboard Menu. Select Deactivate Site button from the Actions drop-down list.
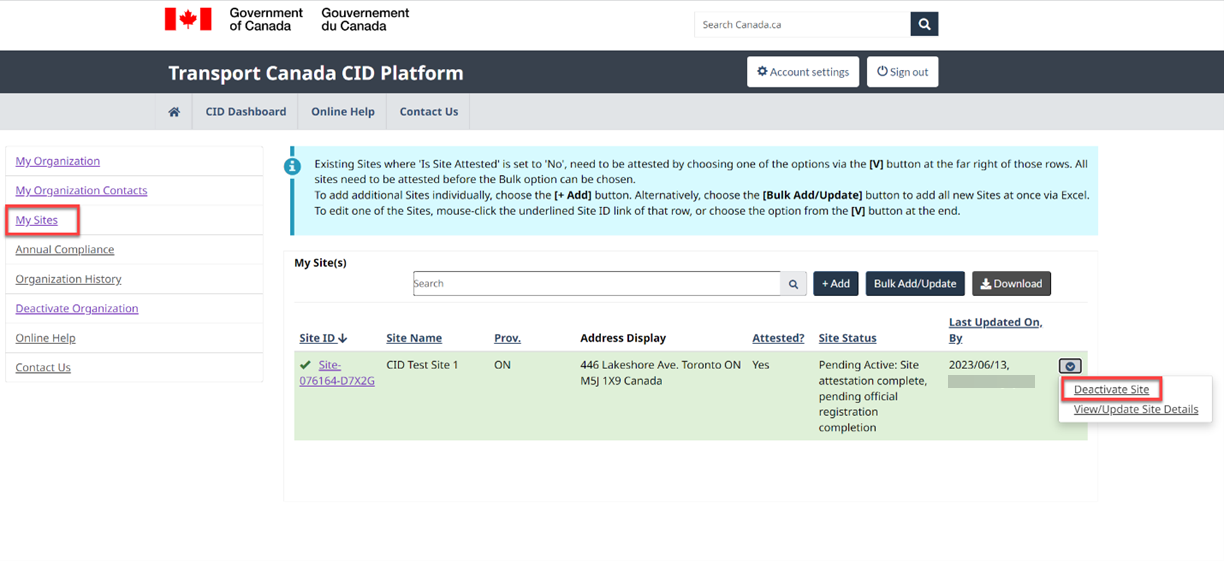
-
The Deactivate Site page appears.
Select the effective date the deactivation will occur.
Select a reason for the deactivation from the drop-down list.
Optionally enter a site deactivation memo.
Place a checkmark beside Attestation and select the Deactivate Site button.
3.4.3 Reactivate a Site
-
Select My Sites from the Dashboard Menu. On an inactive site, select the Reactivate Site button from the Actions drop-down list.

-
The Reactivate Site page appears.
Select the effective date the deactivation will occur.
Optionally enter a site reactivation memo.
Select the Reactivate Site button.

3.5 Annual Renewal
-
Select Annual ComplianceFootnote 2 from the Dashboard Menu. Here you can find when your annual renewal is due and the last completion of the annual renewal update. For more information regarding the annual renewal update, refer to section 4.

3.6 Organization history
-
Select Organization History from the Dashboard Menu. Here you will find all related activities done by persons of the organization such as when an organization or site is deactivated.

3.7 Deactivate organization
Note before you deactivate an organization you must ensure that any sites that have been sold or merged. Once you deactivate your organization, all sites will be deactivated.
-
Select Deactivate Organization from the Dashboard Menu. A warning message appears. Are you sure you want to deactivate your organization?
- If No, you will be brought back to the in-year dashboard.
- If Yes, proceed to the next step.

-
The Deactivate Organization page appears.
Select the effective date the deactivation will occur.
Select a reason for the deactivation from the drop-down list.
Enter an organization deactivation memo.
Place a checkmark beside Attestation and select the Deactivate Company and sites button.

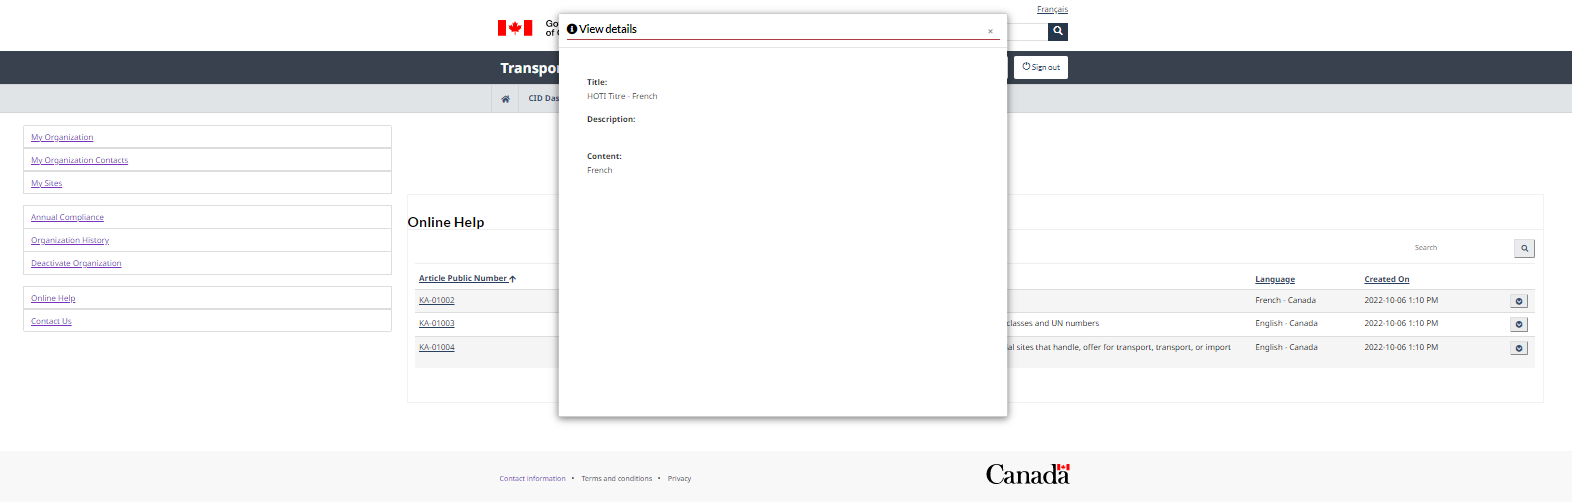
3.8 Online help
-
Select Online Help from the Dashboard Menu, the Online Help page appears.

-
You can view the online help items by double selecting the Article Public Number or selecting View details.

-
The online help item window appears.
3.9 Contact us
-
Select Contact Us from the Dashboard Menu.
Select from the drop-down list a request type.
Enter details regarding the type of request.
Select the Submit button.

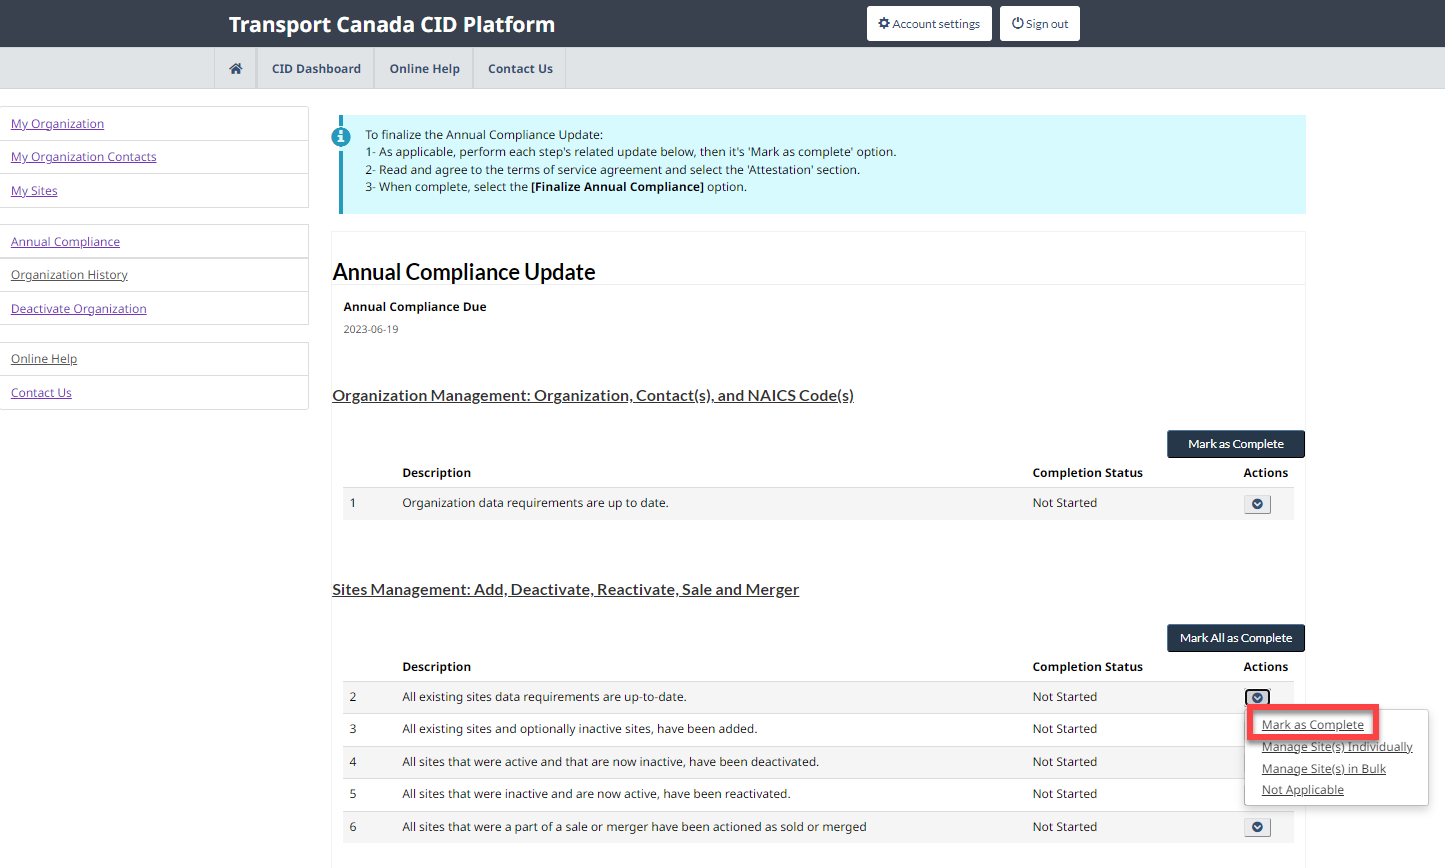
4 Annual Renewal
Once registered, you will need to update and confirm your registration every year. You will receive an email reminder to complete this task 30 days before its company’s anniversary date. Deadline to complete the annual renewal update is 30 days after the company anniversary date.
Review and update the following six (6) requirements to complete the annual renewal update:
- Organization data requirements are up to date.
- All existing sites, and site information requirements are up to date.
- All new sites, and subsequent information, have been added.
- All sites that were active, and that are now inactive, have been deactivated.
- All sites that were inactive, and are now active, have been reactivated.
- All sites that were part of a sale or merger, have been actioned as sold or merged.
- If you are sure there are no changes to be made, you can use the Mark all as Complete buttons to indicate you have finished the update.
-
Once all requirements are marked as done, check the Attestation box and select the Finalize Annual Compliance button.

-
A pop-up confirmation message appears. Select OK to complete your annual renewal.

-
Your next annual renewal will need to be completed one (1) year from your organization’s anniversary date.

4.1 Organization data requirements are up to date
-
Select Update Company from the actions drop-down list.

-
Update any organization information needed. Refer to section 3.2.1 Update legal name, operating name, and address for instructions on how to update your organization's information.
-
When complete, select Mark as Complete from the action's drop-down list.

4.2 All existing sites, and site information requirements are up to date
-
Select Manage Site(s) Individually from the actions drop-down list. Refer to the Bulk Site Upload Procedure if you select Manage Site(s) in Bulk.

-
Update any site information needed. Refer to section 3.4.1 Update site information for instructions on how to update site information.
-
When complete, select Mark as Complete from the actions drop-down list.
4.3 All new sites, and subsequent information, have been added
-
Select Add Site(s) Individually from the actions drop-down list. Refer to the Bulk Site Upload Procedure if you select Add Site(s) in Bulk.

-
Select the +Add button to add any new or optionally inactive sites. Refer to section 2.11 Add a site for instructions on how to add a new site.

-
When complete, select Mark as Complete from the actions drop-down list.

4.4 All sites that were active, and that are now inactive, have been deactivated
-
Select Deactivate Specific Site(s) from the actions drop-down list.

-
Deactivate any sites that are now inactive. Refer to section 3.4.2 Deactivate a site on how to deactivate sites.
-
When complete, select Mark as Complete from the actions drop-down list.

4.5 All sites that were inactive, and are now active, have been reactivated
-
Select Reactivate Specific Site(s) from the actions drop-down list.

-
Reactivate any sites that were previously deactivated. Refer to section 3.4.3 Reactivate a site on how to reactivate sites.
-
When complete, select Mark as Complete from the actions drop-down list.

4.6 All sites that were part of a sale or merger, have been actioned as sold or merged
-
Select Complete any Sales/Mergers from the actions drop-down list.
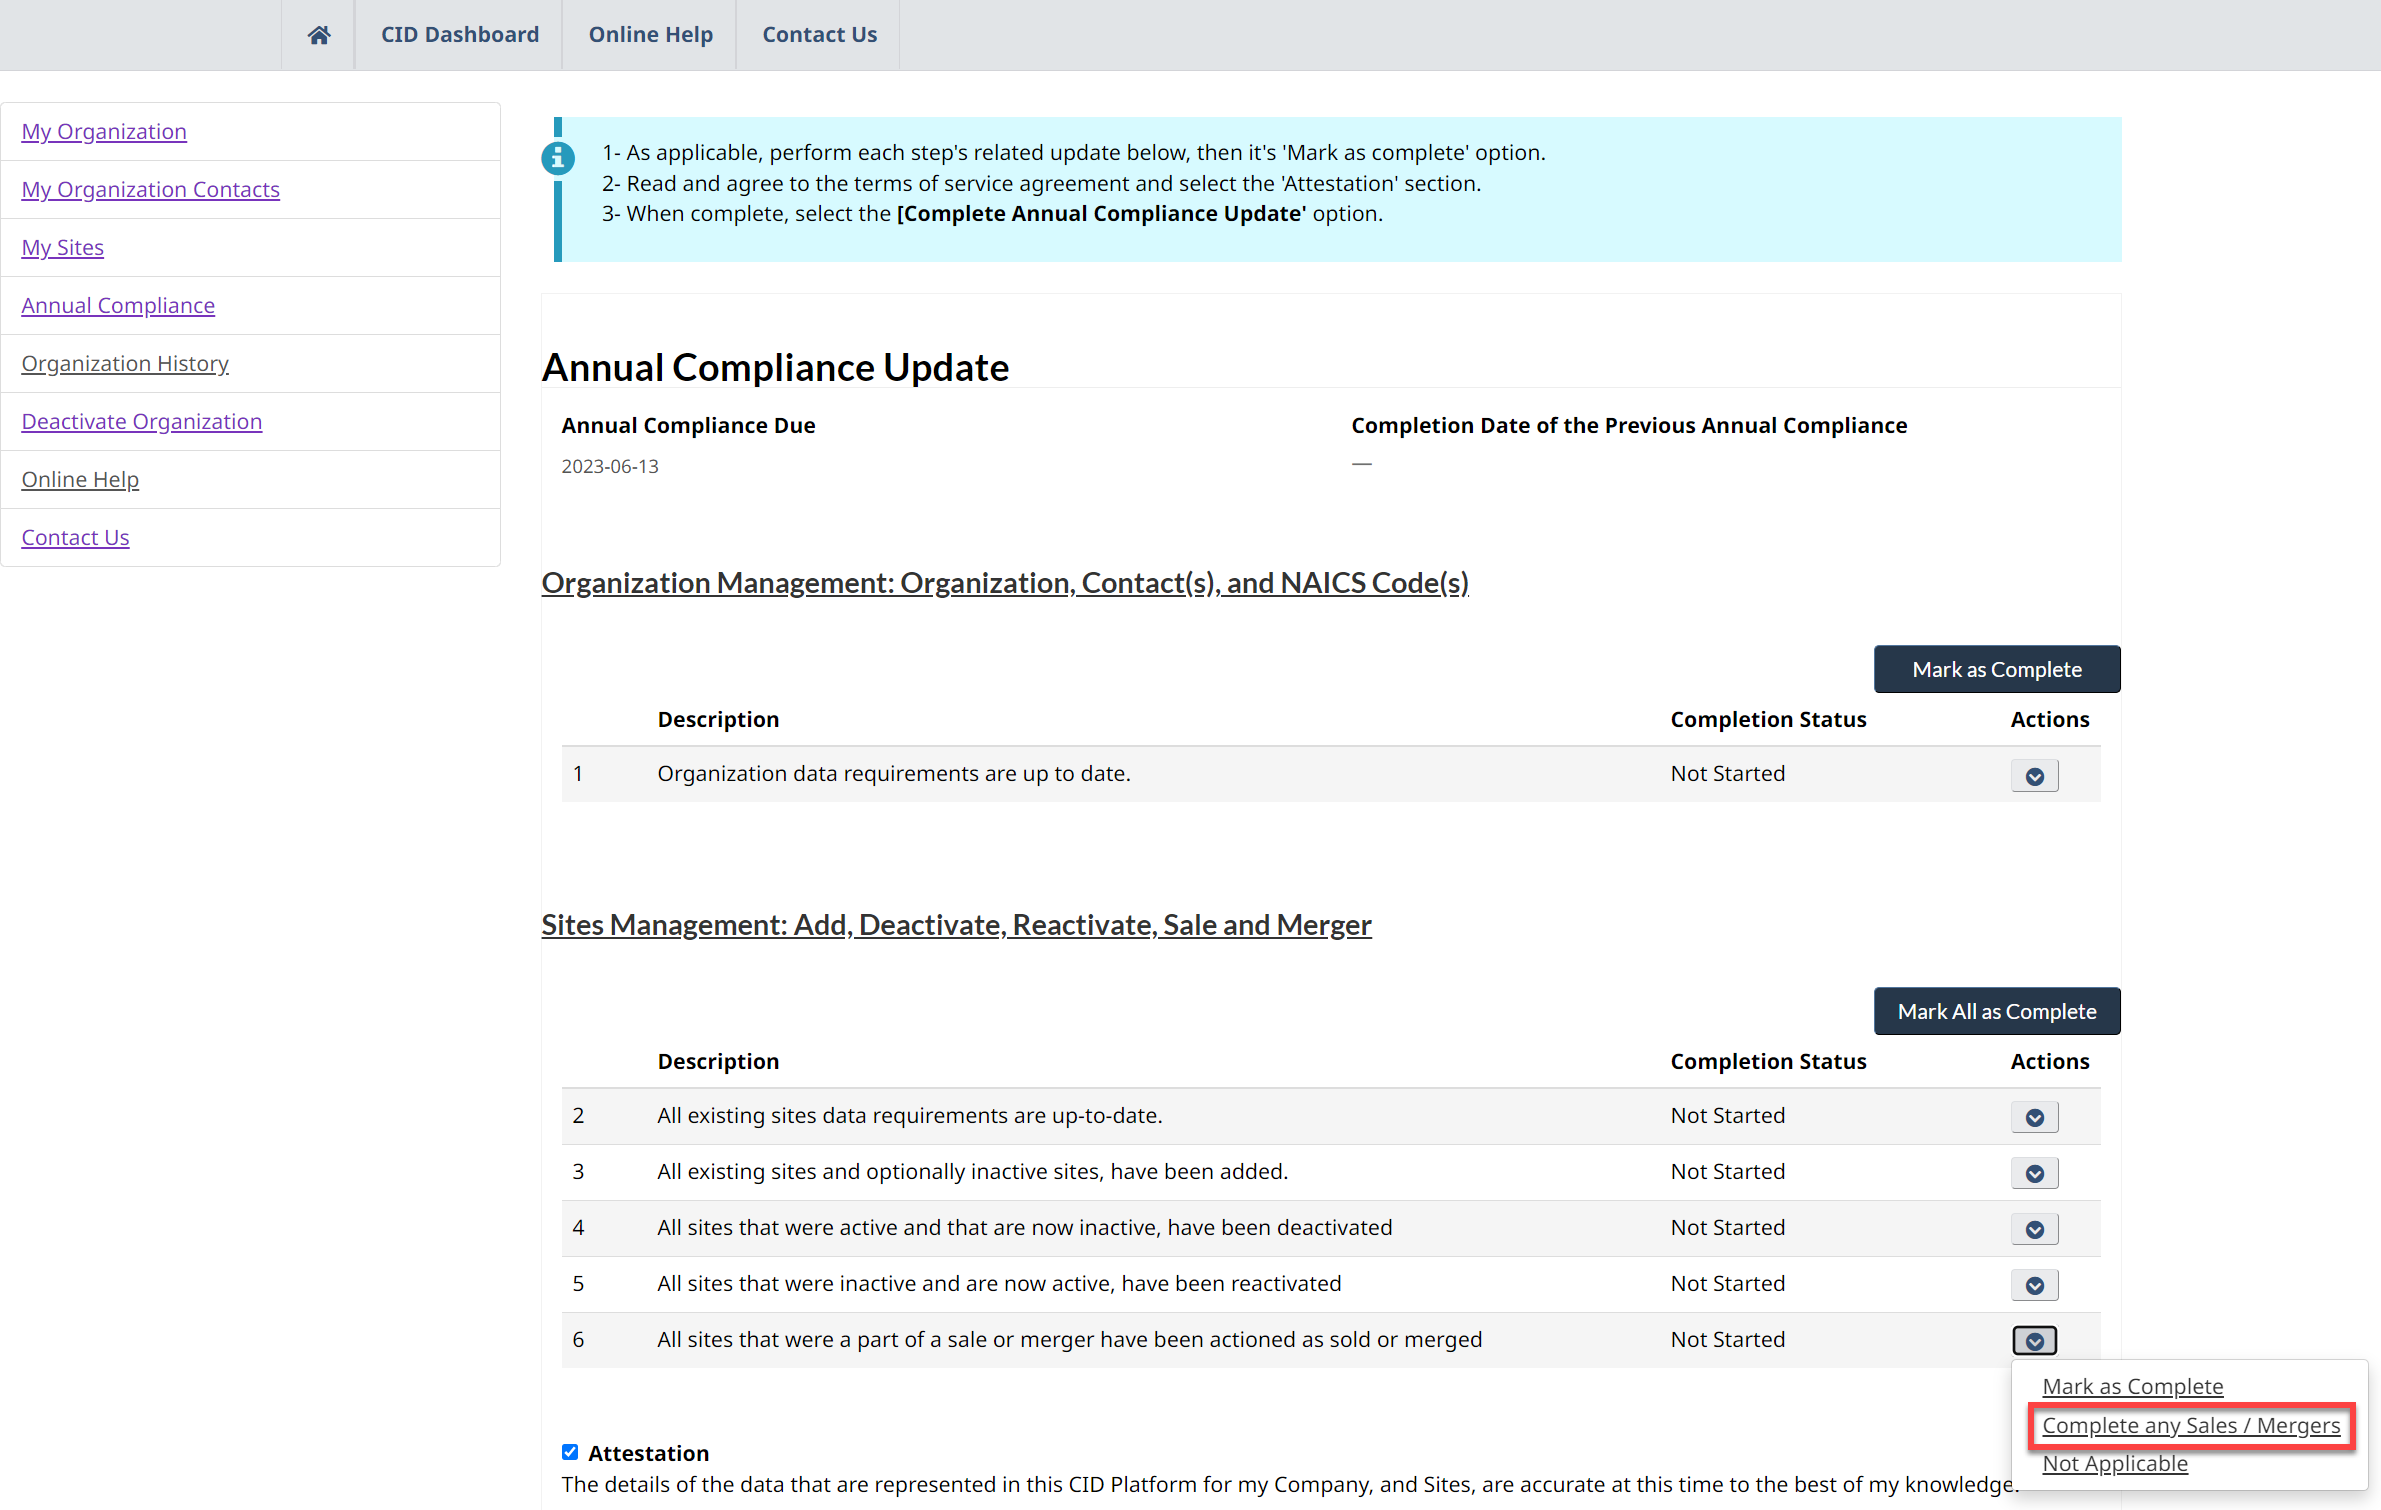
-
Any sold or merged sites are to be deactivated. Refer to section 3.4.2 Deactivate a site on how to deactivate a site.
-
When complete, select Mark as Complete from the actions drop-down list.

5 Contact
We also encourage you to explore our knowledge articles in the Online Help page, which contains helpful tips and tutorials.
6 Appendix A – Bulk site upload
For organizations with multiple sites, an option to load site information by bulk using a spreadsheet is possible. Refer to the following procedure for details or to download a copy of the Bulk Site Upload worksheet [XLSX, 1.12 MB] to use as a reference.
7 Appendix B – Classes/divisions and compatibility groups
|
Class/Division |
Description |
|---|---|
|
Class 1.1 |
Substances and articles which have a mass explosion hazard |
|
Class 1.2 |
Substances and articles which have a projection hazard but not a mass explosion hazard |
|
Class 1.3 |
Substances and articles which have a fire hazard and either a minor blast hazard or a minor projection hazard or both, but not a mass explosion hazard |
|
Class 1.4 |
Substances and articles which present no significant hazard |
|
Class 1.5 |
Very insensitive substances which have a mass explosion hazard |
|
Class 1.6 |
Extremely insensitive articles which do not have a mass explosion Hazard |
|
Class 2.1 |
Flammable gases |
|
Class 2.2 |
Non-flammable, non-toxic gases |
|
Class 2.3 |
Toxic gases |
|
Class 3 |
Flammable liquids |
|
Class 4.1 |
Flammable solids, self-reactive substances, and solid desensitized explosives |
|
Class 4.2 |
Substances liable to spontaneous combustion |
|
Class 4.3 |
Substances which in contact with water emit flammable gases |
|
Class 5.1 |
Oxidizing substances |
|
Class 5.2 |
Organic peroxides |
|
Class 6.1 |
Toxic substances |
|
Class 6.2 |
Infectious substances |
|
Class 7 |
Radioactive material |
|
Class 8 |
Corrosive substances |
|
Class 9 |
Miscellaneous dangerous substances and articles |
|
Compatibility Group |
Description |
Possible Class |
|---|---|---|
|
A |
Primary explosive substance |
1.1 |
|
B |
Article containing a primary explosive substance and not containing two or more effective protective features. Some articles (such as detonators for blasting, detonator assemblies for blasting and primers, cap-type) are included in the compatibility group set out in column 2 even though they do not contain primary explosives |
1.1 |
|
C |
Propellant explosive substance or other deflagrating explosive substance or article containing such an explosive substance |
1.1 |
|
D |
Secondary detonating explosive substance or black powder or article containing a secondary detonating explosive substance, in each case without means of initiation and without a propelling charge or article containing a primary explosive substance and containing two or more effective protective features |
1.1 |
|
E |
Article containing a secondary detonating explosive substance, without means of initiation, with a propelling charge (other than one containing a flammable liquid, flammable gel, or hypergolic liquids) |
1.1 |
|
F |
Article containing a secondary detonating explosive substance with its own means of initiation, with a propelling charge (other than one containing a flammable liquid, flammable gel, or hypergolic liquids) or without a propelling charge |
1.1 |
|
G |
Pyrotechnic substance, an article containing a pyrotechnic substance or an article containing an explosive substance and an illuminating, incendiary, tear- or smoke-producing substance (other than a water-activated article or one containing white phosphorus, phosphides, a pyrophoric substance, a flammable liquid, flammable gel, or hypergolic liquids) |
1.1 |
|
H |
Article containing an explosive substance and white phosphorus |
1.2 |
|
J |
Article containing an explosive substance and a flammable liquid or flammable gel |
1.1 |
|
K |
Article containing an explosive substance and a toxic substance |
1.2 |
|
L |
Explosive substance or article containing an explosive substance and presenting a special risk (e.g., that is due to water activation or to the presence of hypergolic liquids, phosphides, or a pyrophoric substance) that needs isolation of each type |
1.1 |
|
N |
Articles containing only extremely insensitive detonating substances |
1.6 |
|
S |
Substance or article packed or designed so that any hazardous effects arising from accidental functioning are confined within the means of containment unless the means of containment has been degraded by fire, in which case all blast or projection effects are limited to the extent that they do not significantly hinder or prevent firefighting or other emergency response efforts in the immediate vicinity of the means of containment |
1.4 |
8 Appendix C – Definitions and terminology
The following terms and definitions are included in this document.
|
Term |
Description |
|---|---|
|
Address Line 2 |
Any other information about the site, like a room number or specific entrance. |
|
Address Line 3 |
Any other relevant information, like your desk number or office cubicle. |
|
Bulk site upload Excel workbook |
The name of the workbook used to upload multiple sites information at once. |
|
CID Dashboard |
The menu used to navigate to different pages after completing initial registration. |
|
Company anniversary date |
The date the organization completes their initial registration. |
|
Handling |
Loading, unloading, packing, or unpacking dangerous goods in a means of containment. |
|
Inbound |
Dangerous goods arriving at, travelling to, or shipped to a site or location that is identified on a TDG shipping document or, if available, other document when a TDG shipping document is not required. |
|
Latitude/Longitude |
A global address given as two numbers. In this case, latitude must be between 40.0000 and 80.0000 and longitude must be between -50.0000 and -150.0000. |
|
Legal land description |
A written statement that delineates the boundaries of a piece of real property. Is applicable only to Manitoba, Saskatchewan, Alberta, and some parts of British Columbia. |
|
Offering for Transport |
Choosing a carrier, and/or preparing goods for transport by a carrier. |
|
Primary Contact |
The site representative who may accompany the inspector during an inspection and who will be named in the inspection report. |
|
Remote location |
A location identified by latitude and longitude only because the location lacks a postal address. |
|
Secondary Contact |
A secondary site representative. |
|
Site |
A facility where TDG regulated activities occur and where inspectors may conduct an inspection. “Site” is used synonymously with “account” and “company”. |
|
Transport Canada CID platform |
The application used by Transport Canada to gather client operating information. |
|
Transporting |
Moving dangerous goods from one place to another. |
9 Appendix D – Related documents
Transportation of Dangerous Goods Act 1992
Transportation of Dangerous Goods Regulations (TDGR)
North American Industry Classification System (NAICS) Code(s)