
On this page
- 1. Introduction
- 2. The landing page: My Organizations
- 3. Add an organization
- 4. Request access to an organization
- 5. The “Add Organization” form
- 6. Your organization's Dashboard
- 7. My Organizations
- 8. TDG Services
1. Introduction
TDG Online is Transport Canada’s web portal for transporting dangerous goods.
This is the second of three initial user guides for TDG Online. Changes made to this user guide correspond to changes made to TDG Online in December, 2024. TDG Online is Transport Canada’s web portal for transporting dangerous goods.
This second user guide assumes that you’ve read the first one, TDG Online User Guide – Setting Up Your Accounts. It continues from where the first guide left off. If you haven’t gone over the previous user guide, please do so.
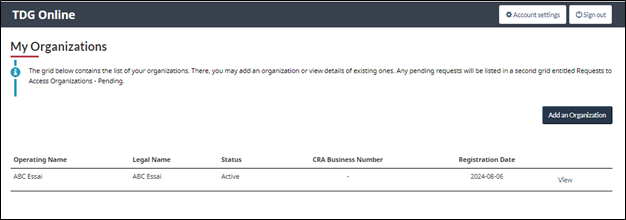
2. The landing page: My Organizations
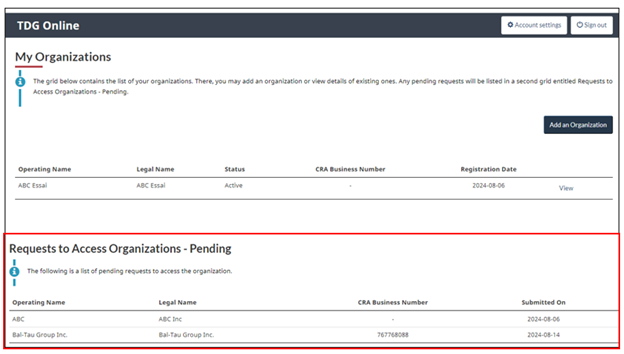
After creating your TDG Online account, the “My Organizations” landing is returned. Once you've added organizations, they will appear in the table. In the table below, the organization “ABC Essai” is already present in “My Organizations”.
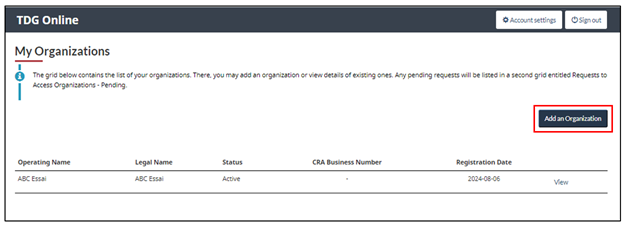
3. Add an Organization
-
Click on “Add an Organization”
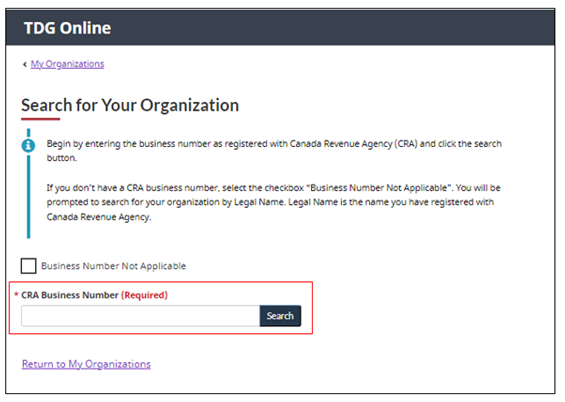
3.1 Search for your organization with the CRA Business Number
-
Enter the organization's CRA business number in the field labelled “CRA Business Number” and click “Search”
Note: If you have a CRA business number, please be sure to enter it because it will help ensure accuracy.
- If you’ve entered a legitimate business number, the business name will be returned you can request access to it.
- Complete the “Request Access” form by providing a reason for the request
- Click “Submit”
- A confirmation message is returned. Click “Continue. An email will be sent to current users in the organization asking them to give you access.
- The “Requests to Access Organizations – Pending” table is added to the landing page.
- The organization to which you’ve requested access is added to the table.
- Once access is granted, the organization will move from the “Requests to Access Organizations – Pending” table to the “My Organizations” table.
- If, however, you’ve entered a legitimate business number, but it doesn’t exist within the system, you will be asked to add it.
- Click on “Add New Organization” button.
- The “Add Organization” form appears.
-
Complete the four sections of the form and click “Save”.
Note: The “Add Organization” form is very long. For ease of viewing, it is broken down into 4 screenshots below. The whole “Add Organization” form will be addressed in detail later in this guide.


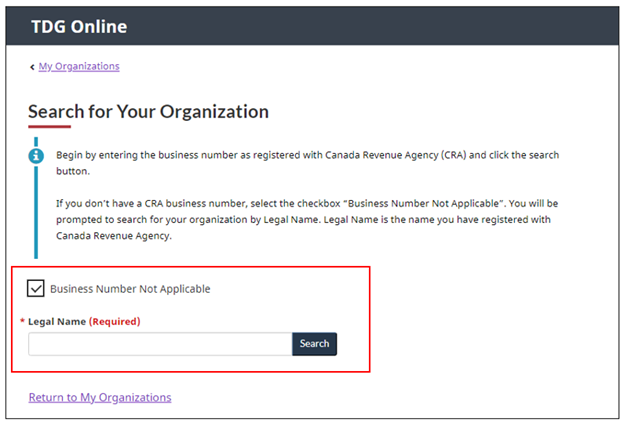
3.2 Search for your organization without a CRA Business Number
- If you don't have a CRA business number, check the “Business Number Not Applicable” checkbox
- The screen will refresh with the field “Legal Name” replacing the “CRA Business Number” field
-
Enter the organization's legal name and click “Search”
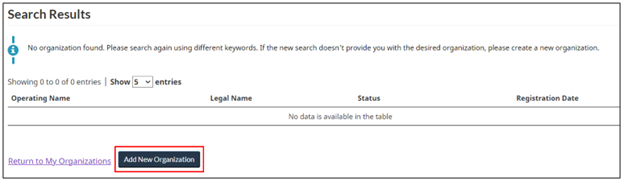
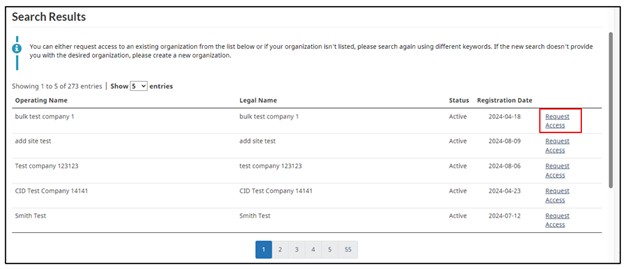
- The search results are returned

- At this point, you can do one of two things:
- You can request access to an organization by selecting “Request Access” or
- If your search didn’t return what you were looking for, you can add the organization by selecting “Add New Organization”.

-
Complete the four sections of the “Add Organization” form and click “Save”. The whole “Add Organization” form will be addressed in detail later in this guide.
Note: The “Add Organization” form is very long. For ease of viewing, it is broken down into 4 screenshots below. The whole “Add Organization” form will be addressed in detail later in this guide.


- The organization’s dashboard comes up. The dashboard will be addressed in detail later in this guide.
4. Request access to an organization
Once you've found the organization you want to access, locate it in the “Search Results” table.
-
Click “Request Access”
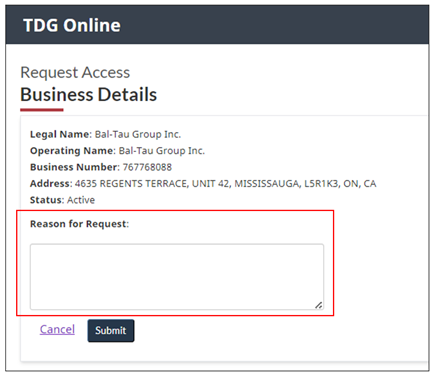
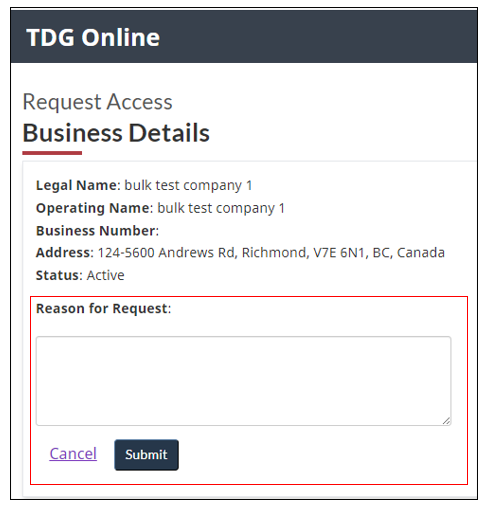
- The “Request Access” form appears
- Fill in the “Reason for Request” field
- Click the “Submit” button
-
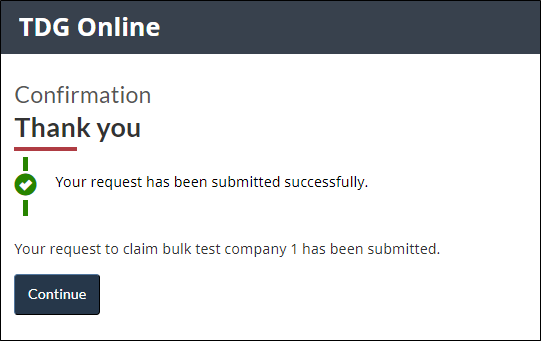
An email will be sent to current users in the organization asking them to give you access
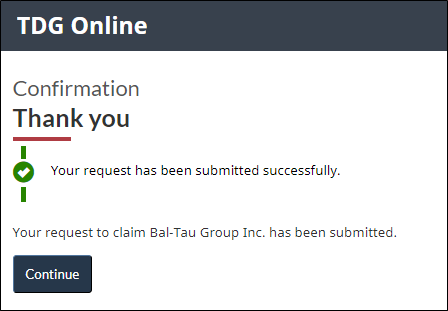
- A confirmation message is returned to the screen
-
Click “Continue”
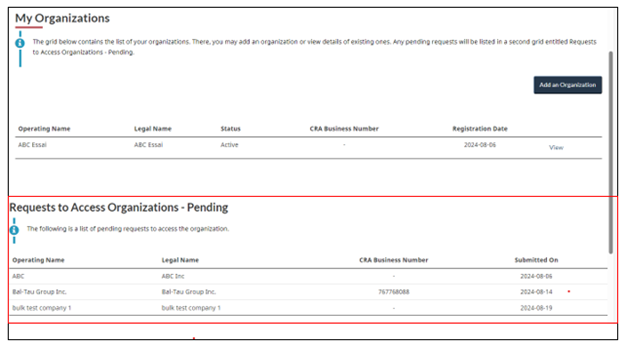
- The “My Organizations” page is refreshed. A new table, “Requests to Access Organizations – Pending”, is added
-
When your access request is approved, the organization, FIRST AIR in this example, will move from the “Requests to Access Organizations – Pending ” table to “My Organizations” table
-
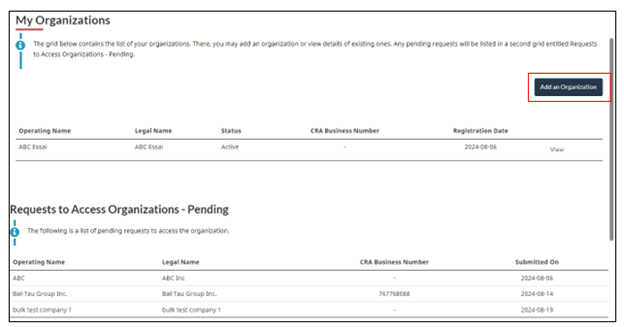
Note that you can also add an organization from the My Organizations page by clicking on “Add an Organization”
5. The “Add Organization” form
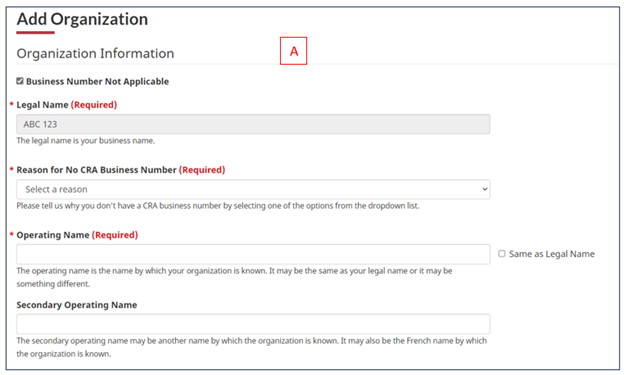
The “Add Organization” form is made-up of four sections: Organization Information (A), Organization Address (B), Primary Contact Information (C), and Second Contact Information (D).


5.1 Organization Information - Section A
- Complete the “Organization Information” section of the form
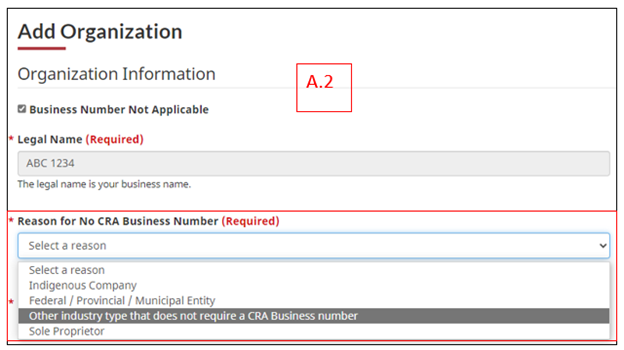
- If you don't have a CRA Business Number, tell us the reason you don't have a CRA Business Number (A.1). Select a reason from the “Reason for No CRA Business Number” dropdown list
- Enter the operating name if it's different than the legal name. Your organization's operating name is the name by which your organization is known. If it's the same, select the “Same as Legal Name” checkbox
-
Enter the Secondary Operating Name. Your organization's secondary operating name may be another name by which your organization is known. It may also be the French name by which your organization is known

-
If you select “Other industry type that does not require a CRA Business Number” (A.2), the form is refreshed and a new field, “Further Details Regarding No CRA Business Number”, is added
-
Tell us why your industry doesn't have a CRA Business Number (A.3)

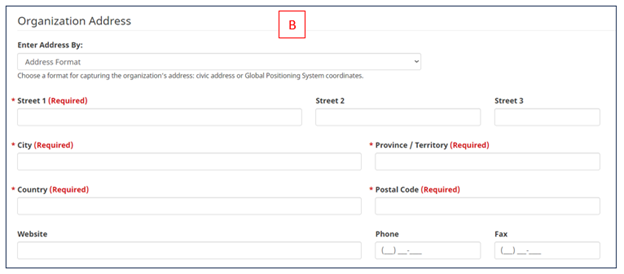
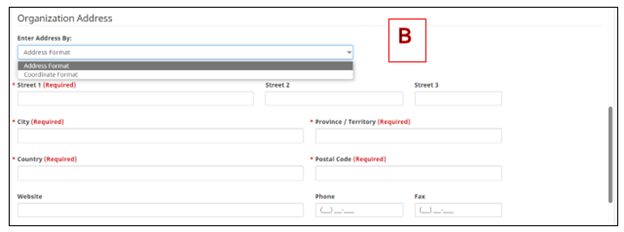
5.2 Organization Address - Section B
-
Provide your mailing address. If your organization doesn't have a mailing address, please select the “Coordinates” format from the dropdown list
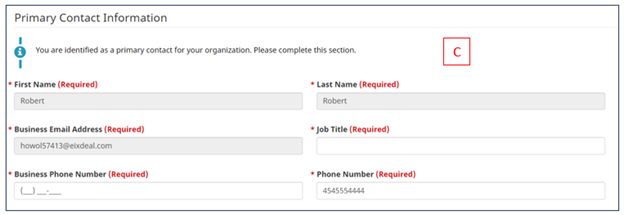
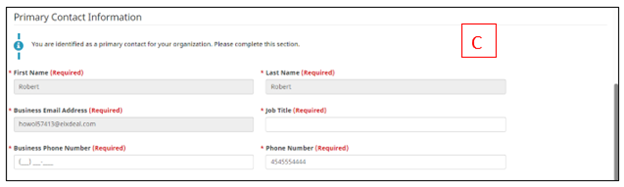
5.3 Primary Contact Information – Section C
- As the primary contact for your organization, please provide:
- your business email
- your business phone number
- your mobile phone number
- your title
5.4 Second Contact Information – Section D
Every organization must have at least two contacts. The second contact added here will receive an invitation via email.
- Provide the second contact's:
- First name
- Last name
- Business Email address
- Select the contact type (primary or secondary) from the dropdown list
- Business phone number
- Mobile phone number and
- Job title
-
Click “Save” to save the entire form

- The Second Contact will receive an email invitation to join your organization in TDG Online
- The Second Contact can accept the invitation by clicking on the link in the email
-
The Second Contact will be brought to the Government of Canada services to sign in and access TDG Online

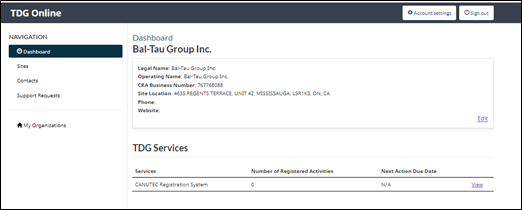
6. Your organization's dashboard
-
Once you've added an organization or you have been granted access to an organization, you can reach the organization's dashboard by clicking on « View » from My Organizations page

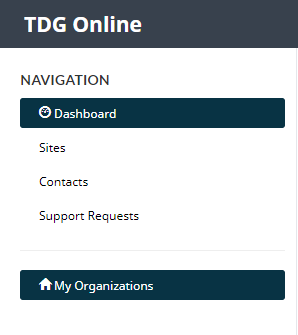
- The dashboard is broken down into three sections: the navigation menu (1), organizational information (2), and TDG Services (3)
- The navigation menu (1) allows access to the organization's:
- Sites
- Contacts
- Support Requests
- My Organizations
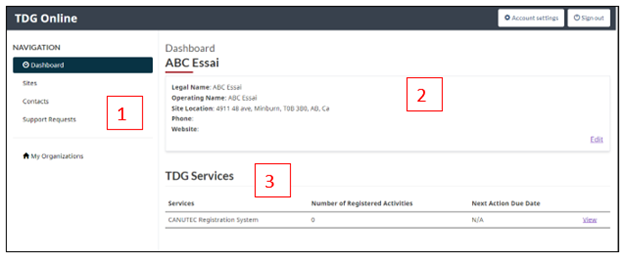
- Click “Edit” to make changes to the organization's information
- Click “View” in TMD Services to access this service

6.1 Sites
- Click the Sites menu item to see a list of sites which are assigned to your organization
- You can edit site information or add a new site
- Click “Edit” if you want to change something in the site information
6.1.1 Add a site to your organization
-
Click the “Add a Site” button

- Complete the “Add Site” form
- Enter a site name and phone number
- Answer the TDG Activity question “Do you handle, offer to transport, transport, or import dangerous goods at this site?”
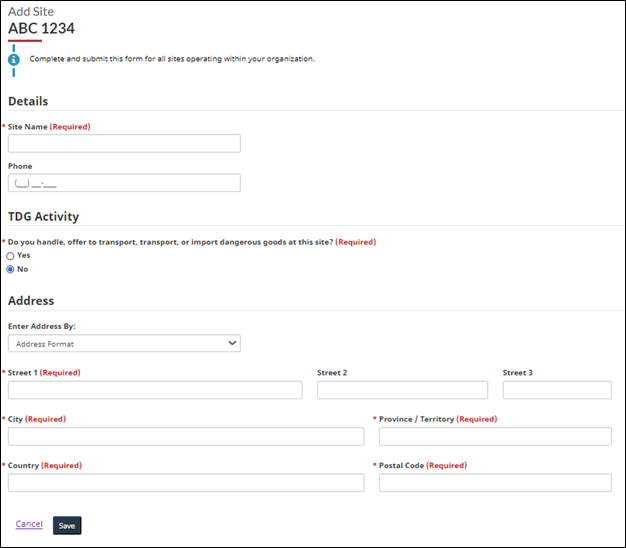
- Answering “Yes” to the TDG Activity question results in you being asked to specify which activities are undertaken at this site. Select the appropriate boxes.
Important Note: Once saved, you will not be able to change the TDG Activity later.
- Complete the address information
- Enter the postal address of the site. If there isn’t a mailing address for this site, you may use the coordinates option
- Select “Address Format” or “Coordinate Format” from the “Enter Address By” dropdown list
- Select “Save”

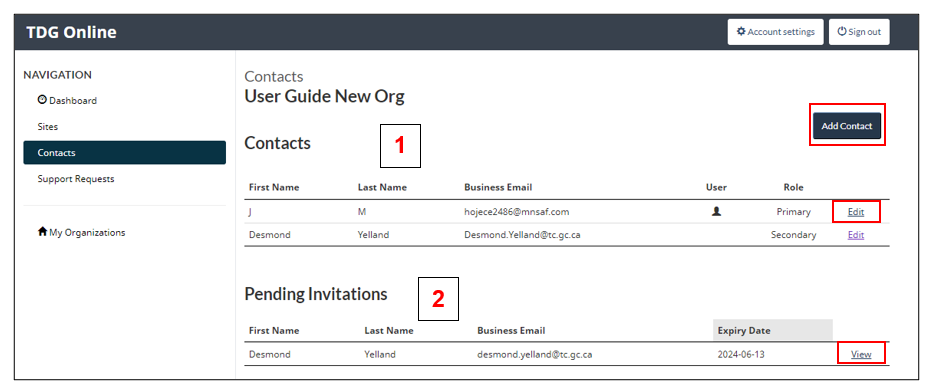
6.2 Contacts
-
Click the Contacts menu item to see a list of organizational contacts (1) as well as pending invitations (2)
6.2.1 Add a contact to your organization
-
Click the “Add A Contact” button
- Complete the “Add A Contact” form
- Enter the first name and last name
- Enter the business email address
- Enter the phone numbers
- Select the contact type (primary or secondary) from the “Contact Type” dropdown list
- Enter the person's job title
- Select the “Send this contact an email invitation to become a TDG Online User” checkbox if you would like to send an email invitation to the person you are inviting

- The contact you have invited will receive the following email. The contact will then select the hyperlink within the body of the email to accept your invitation.

6.3 Support Requests
- From the Support Requests menu item, you can see a list of all support requests that you or someone else created or that the system created on your behalf
-
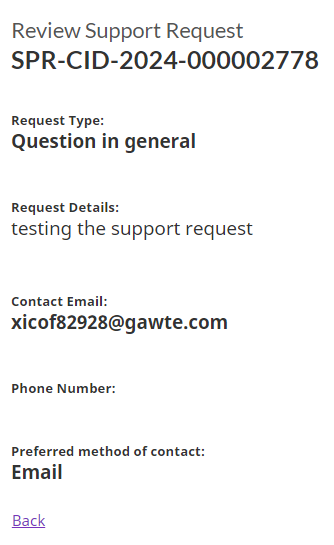
Click “View” to see a support request
-
Details of the support request are returned
6.3.1 Create a support request
-
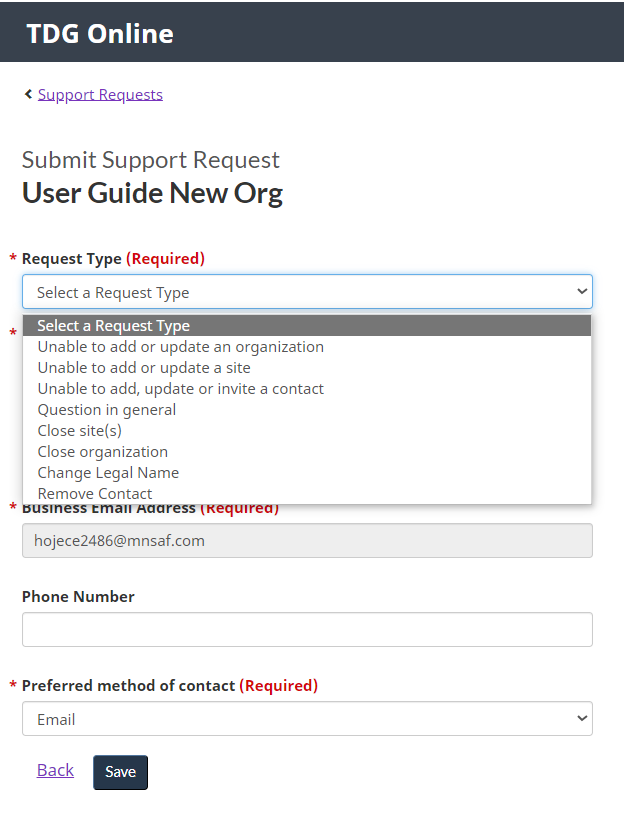
Click the “Create Support Request” button

- Complete the form “Submit Support Request”
- Indicate the type of request you are making by selecting it from the options in the dropdown list
- Your email should be auto-populated
- Enter your phone number
- Indicate how you prefer to be contacted
-
Click “Save”
-
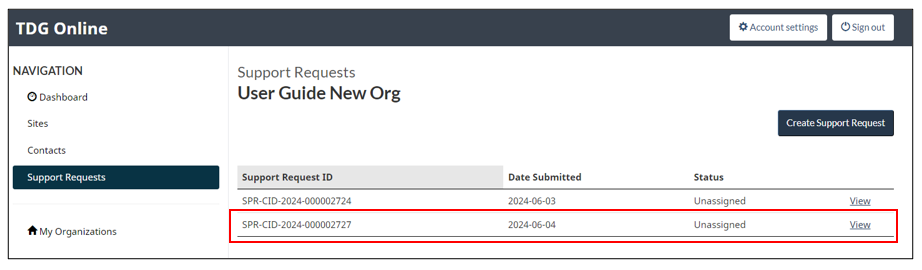
This confirmation is returned. Note that the support request confirmation number is included

-
The confirmation number is then added to the Support Requests table
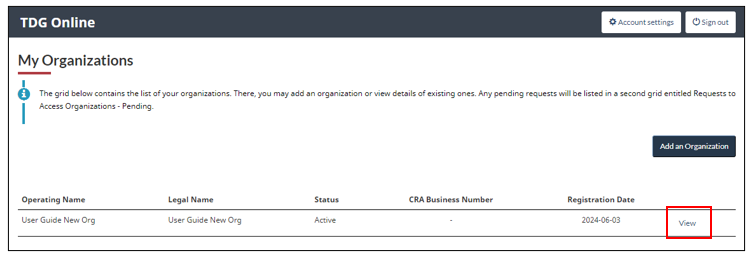
7. My Organizations
-
Click “My Organizations” menu item to go back to the My Organizations landing page
-
Click “View”
8. TDG Services
- In TDG Services section of the dashboard, click “View” next to the service you want to access. In this instance, you will access CRS
- If your organization is already registered for the selected TDG Service, you will see your registration information
- If not, the CRS registration process will be launched
